Articles in this series:
- The key to precise sharpening and noise reduction in DaVinci Resolve
- The key to accurate shot match in DaVinci Resolve’s Color Trace
- Unexpected clipping in DaVinci Resolve and how to avoid it
- Full data and video levels in DaVinci Resolve – don’t clip your proxies and transcodes
Full data and video levels in DaVinci Resolve – don’t clip your proxies and transcodes!
This article is about the difference between Full data and Video levels and how Resolve’s video pipeline deals with them. Most of the time this is an automatic process and there’s nothing to do, but there can be problems with clipping when you’re not grading with Resolve but just using it to transcode your rushes or to make proxies.
I’ll start with a quick explanation of Full and Video levels for those who find them confusing. If you’re familiar with this, skip down to the section on Resolve’s video pipeline.
Full and Video levels
There are two standards for digital images. One is for photos and graphics, the other is for video. Properly displayed, a picture will look identical in both standards. The difference is the way each of them defines what’s black and what’s white.
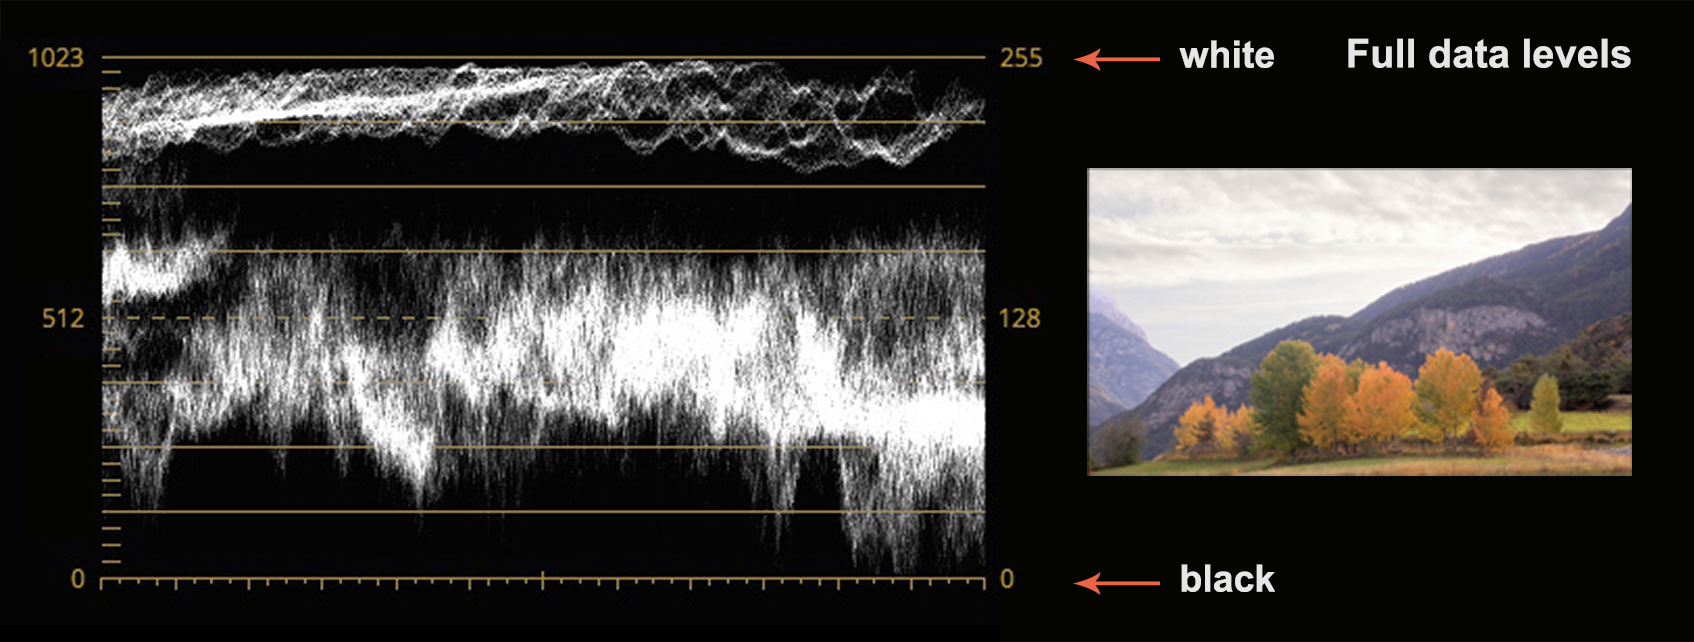
Photos and graphics (RGB files) use Full data levels. If you look at this on a waveform monitor, you’ll see the luminance takes up the full digital data range available. Black is 0 and white is 255 for an 8-bit file (0 to 1023 for a 10-bit file). (Technically, black is in fact 4 in both cases since the values from 0 to 3 are reserved for other data)

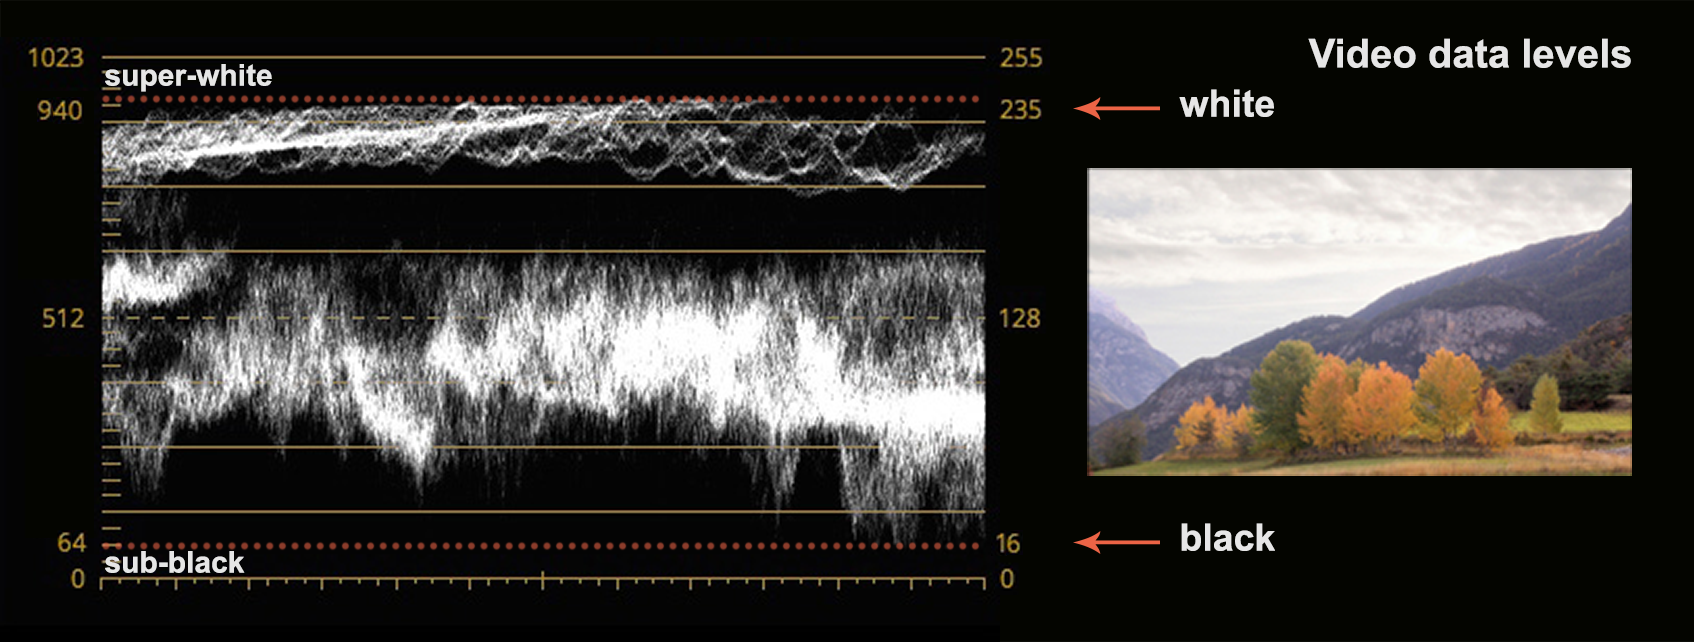
Video (usually YCbCr files, aka YUV) uses the same data range, but sets the level for black at 16 and white at 235 (64 and 940 respectively for a 10-bit file). This leaves some headroom at the top and the bottom in case the lighting changes during a shot and the signal spills over the limits. Anything below 16 (64 in 10-bit) is known as “sub-black” and anything above 235 (940 in 10-bit) is known as “super-white“.
(Note: Video levels are sometimes referred to as “Legal” or “Rec709” levels in other applications)

Dealing with these two standards is usually straightforward. The software will interpret files with a codec for still images (jpg, png, dpx, etc) as Full levels and files with a video codec (H264, ProRes422, DNxHD etc.) as Video levels, and it will display the blacks and whites accordingly. That’s why an image will appear identical in each of the two standards.
Resolve’s video pipeline
Most video editing applications use Video levels as their working space. The signal of a video file remains the same from import to timeline to export. All the information, including the super-whites and sub-blacks are conserved throughout the process. If you import a file with Full data levels, the NLE will automatically convert these to Video levels, lowering the whites from 255 to 235 and raising the blacks from 0 to 16. Nothing is clipped.
DaVinci Resolve, on the other hand, uses Full data levels as its working space. It converts media with Video levels to Full data levels in the timeline, and then back to Video levels when exporting on the Delivery page.
As this is an unfamiliar way of working, it’s worth going through the process in detail. Think of it as a pipeline with three stages: the input (clips in the Media Pool), the working space (Edit page, Color page, etc.) and output (Delivery).
In the Media Pool, input is controlled in “Clip Attributes”: “Auto” will assign Full or Video levels depending on the clip file’s codec, as explained above. “Full” will force the clip to Full levels and “Video” to Video levels.
There are similar settings for output on the Delivery page in the Advanced Settings of the Video tab. Again, “Auto” will choose the appropriate standard for the video codec you’ve chosen for export, “Full” and “Video” will force Resolve to use one or the other, whatever the codec.
The working space can’t be changed, it always uses Full data levels.
Using default “Auto” in Clip Attributes and Delivery
These are the various combinations Resolve applies automatically with the default “Auto” setting in both Clip Attributes and the Delivery page:
Note: The waveform illustrations below are essentially diagrams to show what’s happening. You won’t actually see the waveform changing between pages in Resolve. Resolve’s scopes will always display the working space, whatever page you’re on.
Usually this works fine, but there’s a catch with this system when video files have super-whites and sub-blacks (shown here in red).
The super-whites and sub-blacks are pushed outside the limits of Resolve’s working space, so they’ll be clipped on Delivery if you don’t do anything about them.
When you’re grading, that’s not a problem. You’ll notice the whites are clipping on the scopes and lower the gain to bring them back, idem for lifting the blacks.
But if you’re not grading and simply using Resolve to transcode or to generate proxies, it is a problem. The media you deliver will be clipped if you leave the settings on Auto.
The work-around for this before Resolve 15 was to select all your clips in the Media Pool and manually set them to Full in Clip Attributes and then force the Advanced Settings in Delivery to Full as well. That way, the signal goes through the pipeline with no changes (Full to Full to Full) and the rendered clips have the same levels as the original media with no clipping.
Resolve 15 has mostly fixed the issue with a new check box in the Video > Advanced Settings of the Delivery page: “Retain sub-black and super-white data”.
When this is active, the whole process works as it should: Clip Attributes and Delivery can both be left on Auto, the super-whites and sub-blacks will be preserved.
But this option depends on whether the codec you choose for export uses Full or Video levels. It’s available for delivering to Video level codecs but grays out with Full level codecs. So if you want to export a video file with super-whites to a dpx sequence for the vfx team, for example, the super-whites will be clipped.
In fact, it’s right that the option should be grayed out for this. There is no headroom for super-whites and sub-blacks in Full data, so they’ll be clipped by definition. The work-around is, again, to set the Clip Attributes for the media to Full, then nothing will be lost in the pipeline. However, the images in the dpx sequence will lose contrast since the white levels have been pushed down and the black levels have been pushed up. You have a Video levels signal in a file that will be read as Full levels, and you’ll need to warn the vfx team about this. Alternatively you can leave the Clip Attributes on Auto and grade the clip to correct the highlights and shadows before exporting.
So whatever strategy you choose, the fact that the option is grayed out warns you that the codec you’ve selected isn’t designed for super-whites and sub-blacks, you have to manage them yourself.
In Resolve 15, Media Management has also been updated in this respect. The options Move and Copy don’t clip super-whites but Transcode used to. There’s now the same check box for “Retain sub-black and super-white data” and it also grays out with Full data level codecs.
The essentials in working practice
This has been a long article, so for those who want simple, practical conclusions, they are:
- If you’re grading, you manage clipping yourself, so carry on as usual. Don’t activate the option to “Retain sub-black and super-white data” because sub-blacks and super-whites are not broadcast legal and should be clipped if you’re delivering a final Master.
- If you’re delivering proxies or transcoding rushes without grading and the option “Retain sub-black and super-white data” is available, activate it. If it’s grayed out, either change the delivery codec or manage the sub-blacks and super-whites yourself, as suggested above.
- Whatever application you use, not just in Resolve, you have to manage sub-blacks and super-whites yourself if you’re transcoding from a Video levels file to a Full levels codec.
A final observation: In the ever-expanding jungle of video codecs, it’s not easy for software to automatically detect whether the file has Full or Video data levels. Not all RGB (444) files have Full levels, not all YUV (422, 420) files have Video levels. NLEs do a remarkable job, but sometimes make mistakes. A picture that lacks contrast with the blacks unexpectedly high and the whites unexpectedly low could be a Video levels file being interpreted as Full. A shot with crushed blacks and clipped whites could be a Full levels file interpreted as Video. Both errors are easy to correct in Resolve’s Clip Attributes. It can get more complicated in other applications.
A French version of this article can be found on the author’s website, www.pixelupdate.com at the following link: http://www.pixelupdate.com/data-levels/

