Most all of the tools we use in post-production are quite full featured. They’ve been updated over many years with features added along the way. Avid Media Composer is one of the most full featured of the non-linear editors out there. I’ve had several occasion where I’ve been working with other MC users and they ask “how’d you do that?” Or “what was that button?” On the flip side I’ve been working around other editors and I learn something entirely new myself. Here’s a few tools that Media Composer has which you might not know about.
Top and Tail editing
There’s two buttons you can find under the Edit tab of the Command Palette called Top and Tail:

These edit tools are very simple in that they edit either the top or the tail out of a clip: from the playhead to the front of a clip with Top, from the playhead to the back of a clip with Tail. Just hit either the Top or Tail button and the top or tail of the current clip will be extracted. It’s a single button that basically takes what could be 3 or 4 steps and condenses it down into one.
You have to be aware of the track selection as the selected tracks are what tells Media Composer exactly what to extract. For example, if you want to extract the tail of the long clip below on V1 you have to make sure only V1 is selected.
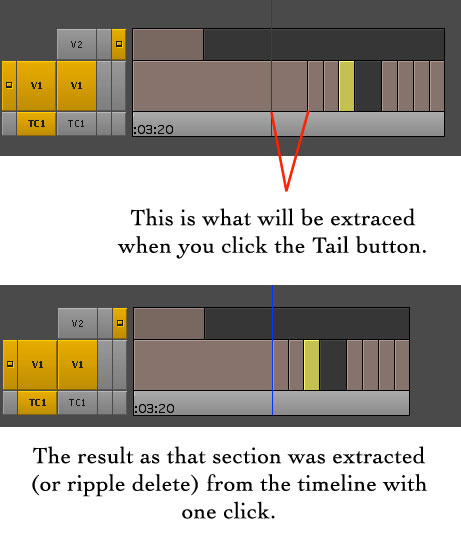
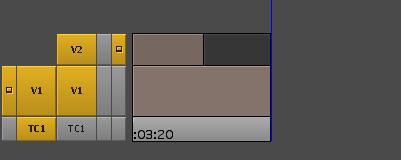
If V2 was also selected the Tail edit would delete all the clips after the playhead.
Stereo audio tracks
With a recent Media Composer update (It was either 5.0 or 5.5) they finally added stereo audio channels. This was a welcome addition as it treats stereo files as a single clip for adjusting levels and moving them in a track. While Add Stereo Audio Track was easy to find in via Clip > New Audio Track Stereo it wasn’t easily clear how to actually get stereo media into them. I imported many a stereo audio file and had no idea how to get it into a stereo audio track until I looked it up.
The key is to use the Clip > Modify command to designate an audio clip as stereo. From the pop-up menu choose Set Multichannel Audio and join both A1 and A2 via the stereo link button:
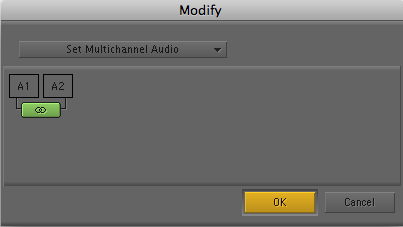
After that is complete those clips can then be edited into a stereo audio track. There’s a few other options that might pop up in the Modify > Set Multichannel Audio menu depending on what is selected in a bin so check the Avid help for more information. I think the most common use will be taking a music file and making it stereo.
It’s also good to know that once a stereo track and clip is in the timeline it can still be set back to mono. Just right + click on a stereo track’s track name and choose Split Track to Mono:
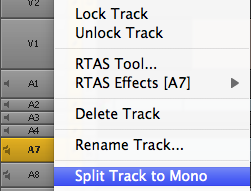
If there’s multiple tracks to make mono just click anywhere in the timeline and choose Split All Tracks to Mono.
Head and Tail Fade Buttons
One common way of adding a fade in or out on a clip is to use the Dissolve button and choosing a custom start or end duration. If you were wanting to fade out to black starting the fade 30 frames before the shot ends into black would create a one second fade to black. But that’s several steps as you have to add a Quick Transition and possibly change the Position, Duration and Start frame. Head and Tail fades are a one button option.

These little fades are very handy but a little tough to explain so here’s the explanation from the Avid help files (my apologies to Avid as I’m sure this is breaking some copyright):
1. Move the position indicator to a clip where you want the dissolve to end or begin.
Your Avid editing application uses the location of the position indicator to begin or end the dissolve. For example, if you move the position indicator ten frames after the beginning of the clip and then use the Head Fade button, your Avid editing application creates a ten-frame dissolve that lasts from the beginning of the clip to the location of the position indicator.2. Select the tracks on which you want to create dissolves.
If you select more than one track, your Avid editing application creates dissolves of appropriate lengths for each track.3. Select Tools > Command Palette.
4. Click the FX tab, and then click Active Palette.
5. Click the Head Fade button or the Tail Fade button.
Head Fade button (left) and Tail Fade button (right)
The dissolves appear in the Timeline. If a dissolve begins or ends at the edit point between two clips, the dissolve crosses between the two clips. Otherwise the dissolve is a fade from or to black.6. (Option) If, for any selected track, there is insufficient source media to create a dissolve of the length you specified with the position indicator, the Insufficient Source dialog box opens. Do one of the following:
Click Size to Fit.
Your Avid editing application creates the longest dissolve possible. For more information on sizing effects to fit available media, see Sizing Effects to Fit the Media.Click Skip Track.
Your Avid editing application does not create a dissolve on the track with insufficient source material but does create dissolves on any other selected tracks with sufficient source material.Click Cancel.
Your Avid editing application does not create any dissolves.
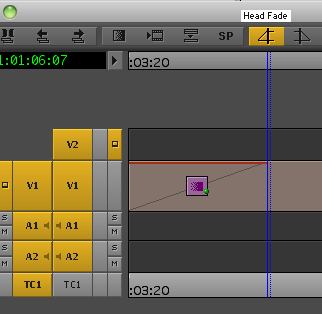
You can see above when happened when I clicked the Head Fade button, a video dissolve was added from the top of the V1 clip to the playhead. There was no audio so nothing could be faded.
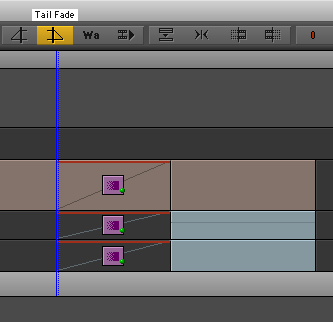
In the above image a Tail Fade dissolved both audio and video from the playhead to the clips after. With 2 clips on V1 this became a dissolve where the audio fades from silent into the audio.
I admit sometimes I get confused if it should be a Head or Tail fade and have to Undo and try the other.
Sync Point Editing
Not to be confused with the Replace Edit operation (which is the blue edit arrow under the Composer Fast Menu) Sync Point Editing is a special mode of the Overwrite edit that is a very fast way to edit a specific frame from the Source monitor to a specific sync-point in the Record monitor. I most often use it with music videos when I want to put a action on a beat.
To enter Sync Point Editing mode choose Special > Sync Point Editing (or right + click in the Composer window) and a check will appear next to the menu item. You’ll also see the Overwrite icon change with an orange mark:
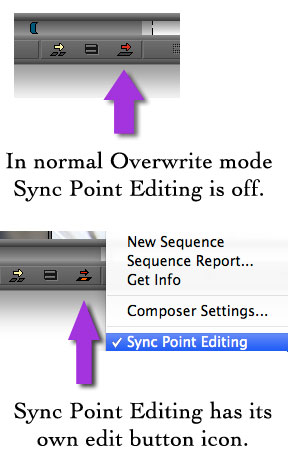
I’ve actually mapped Sync Point Editing to toggle via the keyboard. Once it’s enabled you have to make sure you have the marks set properly for it to work or you’ll get this error:
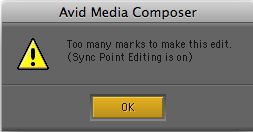
Sync Point Editing uses both the Source and Record monitor playheads (or the blue position indicator as Avid calls it) as the sync point. In other words, the frame where the playhead is parked in the Source will edit to the exact frame where the playhead is parked in the Timeline/Record monitor. The IN to OUT duration is determined by the IN to OUT set in EITHER the Source or Record.
So to make Sync Point Editing work you set the IN to OUT in the Source or Record and set no IN or OUT points in the other as the playhead is used as the sync point where the edit occurs. I guess it’s what you would call a 4-point edit since there’s 4 points set: 1 and 2 being in IN to OUT, 3 being the playhead point of the Source and 4 being the playhead point of the Record.
Reverse Match Frame
That’s pretty self-explanatory. If Match Frame brings the current frame in the timeline up in the Source monitor, Reverse Match Frame is the opposite: it moves the Timeline playhead to the frame displayed in the Source monitor thereby showing it in the Record monitor, that is providing the frame is actually in the edit. It’s easy to use, just find the Reverse Match Frame button in the Command Palette and map it somewhere. Or you could just use the Command Palette as an Active Palette (see next entry) and Reverse Match Frame that way.
You know the Reverse Match Frame button icon as it’s a reverse of the match frame button:

Command Palette as an Active Palette
If you’ve used Media Composer for any length of time then you probably know about the Command Palette. Accessed under Tools > Command Palette (for via command + 3) it’s a tabbed window of many Media Composer buttons and commands. It’s the place where you map the buttons to other places in the interface, including the keyboard, by using the ‘Button to Button’ Reassignment option. You can also use it to map any menu item via the ‘Menu to Button’ Reassignment.

I’ve been surprised how often I encounter Media Composer users who don’t realize that the Active Palette button makes the Command Palette just that: active. When that button is selected clicking any button on the Command Palette will perform that operation. I’ll often bring it for some little used command that I’ve never found the need to map to its own dedicated button on the keyboard or the interface.
Avid Gems from PVC’s Past
I hope there might have been a few gems in this list above you find useful. Speaking of gems, this list of Avid tools you might not use reminded me of a great series that Steve Hullfish did here on PVC a few years ago called Avid Gems. As I was reading over some of those articles looking for the link and I see that Top and Tail editing was one of his gems in Part 1! Since I’m looking at them here’s links to the entire series as there’s some great stuff in there (though some things might have changed as Media Composer has been updated a lot in the last couple of years).
Steve Hullfish’s Avid Gems Part 2; Part 3, Part 4, Part 5, Part 6, Part 7. Part 8, Part 9, Part 10 and Part 11. Good stuff there … I think there was just 11 of them. Maybe I’ll do a part two to Avid Tools You Might Not Use if I can find any that Steve didn’t cover!

Filmtools
Filmmakers go-to destination for pre-production, production & post production equipment!
Shop Now