Here we go with another edition of Third Party Developers Add Timecode-Things to Final Cut Pro X. This time it’s longtime developer CoreMelt adding a source timecode effect that will display the source timecode for clips that it is applied to. The lack of this single feature alone may have kept some editors out of FCPX. The source timecode effect is available in the newest CoreMelt Free download package. Like we did with the recent floating timecode window let’s also see how this effect works in the other NLEs.
Here we go with another edition of Third Party Developers Add Timecode-Things to Final Cut Pro X. This time it’s longtime developer CoreMelt adding a source timecode effect that will display the source timecode for clips that it is applied to. The lack of this single feature alone may have kept some editors out of FCPX. The source timecode effect is available in the newest CoreMelt Free download package. Like we did with the recent floating timecode window let’s also see how this effect works in the other NLEs.
Thank you to CoreMelt, sincerely many FCPX users
Source timecode is important for a number of post-production workflows from being able to track down a specific place in a shot to being able to properly conform an offline for color correction. Final Cut Pro X has always had the ability to read and display source timecode in the timecode viewer in the center of the interface. When you’re in the Browser skimming over master clips displays source timecode. When you’re working in the timeline, turn on Clip Skimming to see source timecode there.
But often you want to display the source timecode via a burn-in. And remember, burn-in timecode will make your client happy. Until now making a source timecode burn-in hasn’t been possible in FCPX.
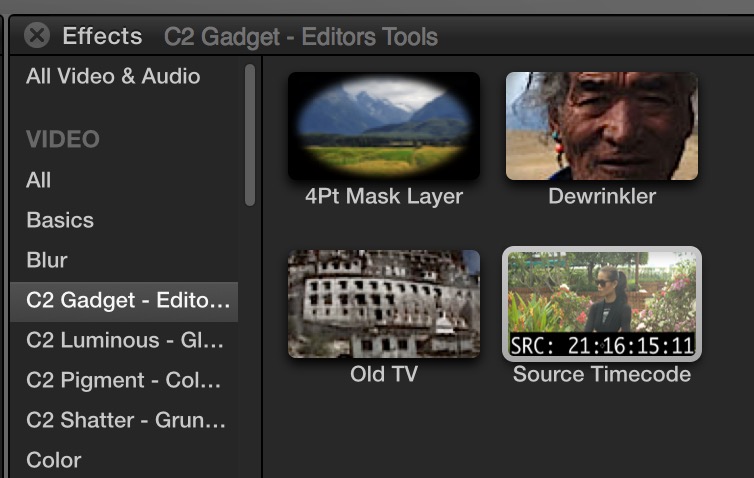
CoreMelt comes to the rescue. First download and install the latest update to the ever useful CoreMelt Free package There’s some 43 options in the thing including an Advanced Vignette, Soft Edge Wipe and some very fun audio-driven meters animations called VeeYou. Once installed check the C2 Gadgets category in the Effect browser.

Look for Source Timecode under C2 Gadget and drag that to your clip or select multiple clips and double click.
With the effect applied you have a choice of what exactly to see and the style to display it in. The default white on black is the industry standard but if you want to adjust color you can. The most important display is the SRC for Source code as that is the master timecode of the original footage. You can also toggle on Record timecode instead of Source which will add a sequence counter from the top of the timeline. There’s another option to not burn in the timecode but rather just display it as an On Screen Overlay. That’s nice if you just want to see source code without using Clip Skimming. It doesn’t work on a Adjustment Layer so you have to apply it to each clip. Unfortunately you can’t adjust the settings on more than one clip at a time even though when you select multiple clips the Inspector says Inspecting 7 Items or how many you have selected. That’s more a limitation of FCPX than the CoreMelt tools.
All of the various parameters for Source Timecode can be tweaked in the Inspector.
Note: The first system I tried CoreMelt Source Timecode with it did not display the correct source or record code. It seemed to be a few seconds off. Looking around the internet I saw that some were reporting the same thing while others said it was working fine. I installed the plug-in on my laptop and it did display the timecode correctly. Same OS and same FCPX version but a different computer; old Mac Pro vs. new Retina Macbook Pro. I spoke with Roger Bolton, the chief brain behind CoreMelt, and he confirmed they have found some cases of incorrect source timecode and they are looking at having an update out next week. You can bet that are working to make this new plug-in work well. I hope they add source clip name as an option of that is possible!
You can see the Source Timecode effect working in the image above. I have Clip Skimming turned on and the source timecode that FCPX is reading matches the burn-in of the CoreMelt plug-in.
This third party addition to FCPX is an important one for many workflows as you’re often asked to provide a reference cutting copy of a final edit for online conform and color correction. That provides a reference for the colorist as they compare the online to the offline to make sure it has conformed correctly. Being able to provided a Source Timecode burn-in as part of that reference means the online team can troubleshoot a problem shot that won’t conform. This will make them happy.
You can also save a preset for your Source Timecode as I did a above with a preset to place the burn-in in the lower right. A step saved.
A couple of caveats here though: Since FCPX doesn’t yet have a remove attributes option be sure you apply this source timecode effect to a duplicate of your final sequence unless you want to go and remove them all by hand. It’s hard to believe we don’t have a remove attributes option yet. There is no option for source clip name which is needed for online troubleshooting so maybe CoreMelt can add that one in the future.
Thanks to CoreMelt for providing this useful tool for free to FCPX users. Will Apple add their own version in the future? It wouldn’t surprise me but until they do we finally have an option. While great to have this FCPX implementation can’t get near as complex when it comes to burning in source data as FCPX’s competitors can.
Source Timecode in Adobe Premiere Pro CC works very nicely as well
Adding Source Timecode for clips on the timeline in Adobe Premiere Pro CC became possible in the 2014.0.1 update, an update that I called the biggest little update you’ll see today due to several minor but important enhancements that were made.
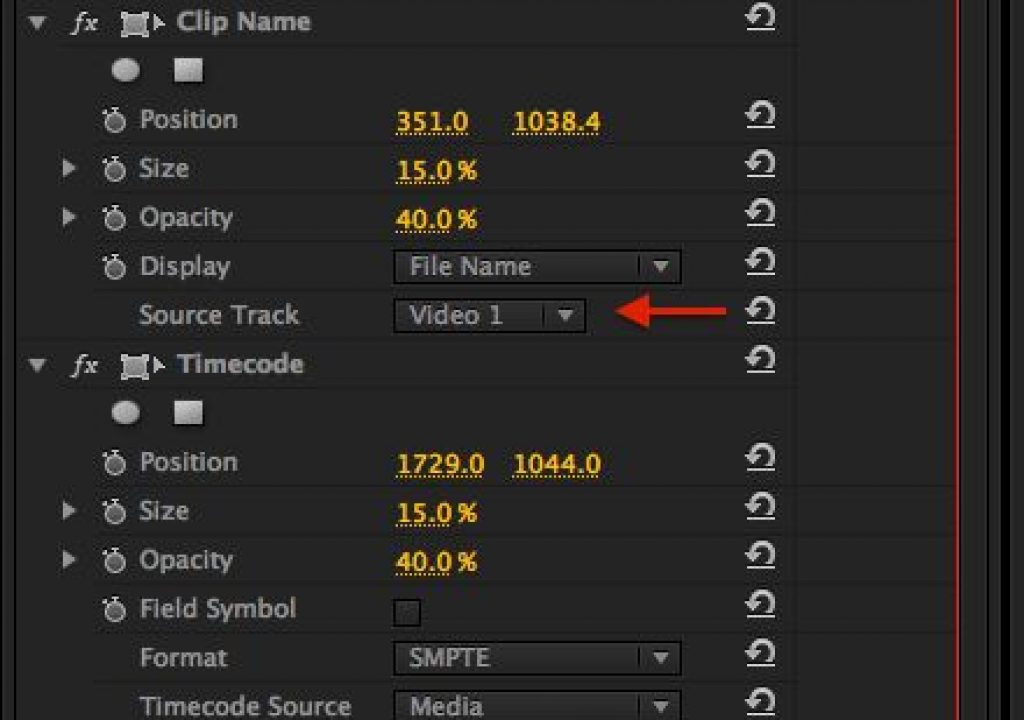
Premiere has had the Timecode Filter for as long as I can remember but this update added the ability to display source track data. That means you could tell PPro to show you source data for what was on Video Track 1 (or whatever track you desired). The key to making this work was to apply both the Clip Name and Timecode filters to a piece of Transparent Video (and not an adjustment layer) and setting the controls accordingly.
In the Effect Controls set Source Track to Video One on both effects. You can adjust size, position and opacity accordingly.
There you have it: source clip timecode and source clip name, ready to make your colorist happy.
Adobe has done a nice job of implementing this tool as it’s able to display a lot of different layers as I found out in a music video where we used a lot of layering as an effect.
This music video had multiple layers of clips blended together using composite modes.
Premiere is able to stack up multiple instances of burn-in display effects so I was able to provide source data on all the layers in one reference.
The addition of this single feature alone moved me to use Adobe Premiere Pro CC for more music videos. And I have seen this data being utilized in an online when a shot didn’t conform properly.
And here’s the result of all that work:
Avid Media Composer is the King of Source Data Burn-In
Like we saw in the Floating Timecode Window discussion Avid Media Composer reigns supreme when it comes to implementation and features. Plus Avid was first to market with this a long time ago. Avid’s Timecode Burn-In can generate different lines of data and can dig deep into all the different metadata that Media Composer is tracking and display them on the screen.
When supplying source data for a conform here’s how I set it up.
Find the Timecode effect under the Generator tab of the Effect Palette.
Drag the effect to an empty Filler track on a nice, tidy timeline to generate the burn-in. This edit had two Timecode Burn-Ins applied.
Avid’s Timecode Burn-In cans show 4 different displays of data as well as a notes track. I can display data from any video or audio track and show options like the source timecode, duration, time remaining as well as several other counter options. In addition to timecode and counters you can see the different name options it can display as well from the pop-up in the above image.
There’s an important thing to note about the above burn-in that points to the power of Avid’s advanced tools. I have told Avid to display the Source Bin Column and / Tape for the source files, not the name of the master clip in the timeline. I often change the name of the master clip while editing to something useful for me for offline. I don’t want that in the burn-in as that’s not useful for online as they would need the camera original source file. I transcoded the RED camera source R3D files to DNxHD 36 for edit but Avid still knows the original source clip name for the offline transcodes as the data is stored in the Tape column via RedCine X. You could also duplicate original clip names to another Avid bin column to preserve that metadata.
You can see the clip at the blue playhead is titled Flowers in graveyard01 but the clip name in the corner is A006_C012_0320Y6. That’s because I have told the Timecode Burn-In to pull the data in V1 from the Source Bin Column > Tape. The original clip name is stored in the Tape column.
When set up properly my burn-in includes the camera original source file name (that’s what online will seek out of they have a problem conforming the edit) as well as the source clip timecode.
The Avid Timecode generator can display a ton of data. In the lower right of the image above is the master sequence timecode which is an important reference for online as well. The lower left is displaying source timecode and RED clip file name. The upper left data is for the clips that were on V2 in the edit as this video had some clips blended over others for a transition effect. Avid Media Composer allows multiple instances of the Timecode Burn-In to be stacked up.
That’s a lot of data that Media Composer can track and display. It points back to Avid’s incredibly deep and powerful feature set that supports many professional workflows. Say what you might about its age and lack of modern editing features but it’s stuff like this that keeps Avid Media Composer at the top of the feature film and episode television heap (among a few other things.)
And here’s the above mentioned video in the Avid section as well:


