
Anybody remember that classic commercial for Reese’s Peanut Butter Cups? “Hey! You got peanut butter on my chocolate! No! You got chocolate in my peanut butter!” Then the two injured parties in the commercial realize that peanut butter and chocolate are really two great tastes that taste great together! They shouldn’t be kept apart. They should be celebrated in a joyful, delicious and nutritious union of flavors!
Well folks, today I’m getting Adobe in my Avid and Avid in my Adobe. Now most of you are probably thinking, “Duh. Everyone combines Photoshop and After Effects with Avid. That’s nothing new.” But I’m taking my Adobe cravings one step beyond the ordinary. I’m going for a Media Composer and Premiere Pro sandwich!
To keep the analogy going, this isn’t some simple “peanut butter and jelly” combination we’ve heard a dozen times before. No! I’m going all out with your Kim Chi and Jolly Ranchers combo or Danish and haggis entr©e.
“But why?” I hear you cry. The reason is simple, it combines Adobe’s Speech Search – with it’s vibrant notes of lavender, leather and florals – with Avid’s ScriptSync – imparting a complex bouquet of citrus, oak and melon.
Introduction

OK, enough with the wine and food analogies. Let’s get to work.
So the gist of this article is that Adobe Premiere Pro can transcribe on-camera interviews with its Speech Search function and Avid has ScriptSync, which allows you to treat scripts like bins. So if you combine the two, you get a semi-automated process by which you can do a very fast edit of an interview-based documentary cut together almost like a word processor. Now, if that doesn’t sound very “artistic” to you, I understand. The “art” part actually comes after you’ve got the best parts of your interview assembled into a solid story. By doing the story part quickly and painlessly, you have even more time for the “art.”
Choices, choices
To start with, we have to determine where we want to capture, edit and finish. The question of which product to use for ingesting your footage depends largely on the camera used for shooting. If you shot with a mini-DV or HDV tape camera, you could probably ingest using either system. For file-based cameras, I’d have to give the edge to Adobe. Premiere Pro can view footage from P2, RED and XDCam without even having to import it. Avid’s new AMA plug-in allows a similar workflow, but Adobe Bridge and Premiere Pro’s Media Browser are pretty compelling reasons for going with Adobe for capture. For old-school tape formats, like BetaSP or DigiBeta or even the high-end HD tape solutions, it will depend on what hardware you own already. If you don’t own any hardware for video capture, then the choice will probably be to capture with Premiere Pro because you can use third party cards and capture boxes like AJA or Blackmagic.
Despite having friends at Adobe, I think the majority of editors in the world would say that you’d want to edit in Avid if you had your choice between the two. It’s a tried and true editing interface. About the only benefit to editing in Premiere Pro would be to maintain the metadata of the clips throughout the entire edit process. Nobody does metadata like Adobe and there are compelling reasons on the back end for maintaining the metadata, as we will see later.
Which solution you use for output will also depend on what your deliverables are and whether you want that metadata. If your deliverables are tape-based, then I think Avid is probably the better solution. Though if cost is a factor, the Nitris and Mojo solutions are considerably more expensive than AJA and Blackmagic. But color correction and tape control are bulletproof on the Avid. The trick is that with output to filebased deliverables to go to the web or delivery on computers or straight to DVD, the advantage goes to Adobe. Using Dynamic Link, you don’t have to render until the final output in Encore as you hop back and forth between Premiere, After Effects and Encore. Even the final sequence doesn’t need to be rendered before being passed on to Encore. And with filebased media, there is still the issue of Adobe’s ability to retain metadata, which will come into play shortly.
A variety of workflows
I can’t run through all of the possible workflows that those six choices create, so I’ll pick one of them and you can adapt it to your personal situation. The interviews I want are on DigiBeta and I’d prefer to capture them via my Kona card than to use my original model Mojo. (I have an ancient Avid Symphony Meridien that would be my first choice for capture, but the OMF Meridien capture is not supported by anyone really.) Also, since the first step in the process is to do the transcription in Speech Search, this means I don’t have to take the additional step of exporting the media from Avid to Premiere. Another similar workflow would be to use OnLocation to capture directly to disk on set or on location. Then do the easy transfer of footage from OnLocation to Premiere. That is similar to the file-based workflows of bringing P2 or XDCam or RED into Premiere.
If you wanted to start with Avid doing the capture, you can easily do that, then cut the full length of all of the interviews into a sequence and export the entire sequence. Then in Premiere Pro, import the file and a bin will be created with the sequence and media just as it left the Avid.
How to Use Speech Search in Premiere Pro
So with your interviews captured into Premiere, the next step is to run them through Speech Search. To do this:
- Drag or double click the file from the Project pane to get it into the Source monitor.
- Choose Window>Metadata to be able to access Speech Search. Because the actual text that is generated by Speech Search is actually embedded into the metadata of the video, Speech Search is accessed through the Metadata pane. At the bottom of the Metadata pane are three buttons (you may need to expand the pane to see them, or hit the tilde key (~) to bring the pane full screen. The buttons are: Play, Loop Playback and Transcribe.
- Click the Transcribe button and the Adobe Media Encoder is launched (so it takes a moment to launch the first time you do this in a project.). The Media Encoder is what actually does the transcribing. My four clips totaled a little over 4 minutes in length and took less than 6 minutes to encode at the high quality (slow) setting. So figure maybe 150% of realtime for processing.
When the files are complete, you can see the transcription in the metadata window at any time you have the clip called up in the source window.
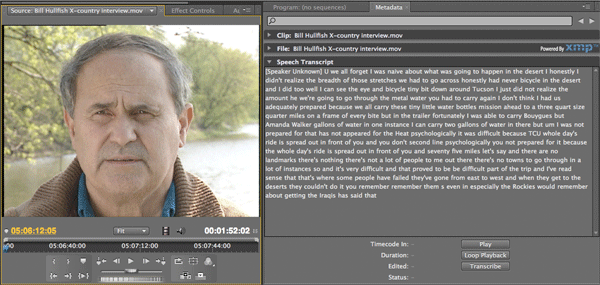
Above is a screen capture of an unedited transcript from Speech Search. I’d say this transcription is about 90% correct. It’s a little hard to read because of just the stream of conscious manner of speaking and the fact that Speech Search doesn’t add punctuation.
If you play the footage in the source monitor, each word is highlighted as it is spoken, so it is very easy to go through the transcript and clean up the incorrect words. If you right-click on the text, you get options to merge two incorrect words, separate a word into two words, insert words or delete words. This is important to do because if you just highlight one word and type two words to replace it, then those two words are considered one word when you go to search on them. So for the purposes of searching, you can be sloppy about this on un-important words, but on “key” words that you want to be able to search on, make sure you have separated and combined words properly.
I cleaned up the four minutes of transcripts in about 15 minutes. Now you may say, “I could transcribe 5 minutes of transcripts in the 20 minutes that it took you to do it in Speech Search” (which I would doubt). But remember that now that it’s done, I can instantly search and locate the exact moment in time that any of those words are spoken. I don’t have to search a transcript and then try to guess at a timecode from some point that’s maybe two minutes away. Every word in the text gives you instant non-linear access to the precise moment in the clip…if you stay in Premiere.
Massaging in a word processor for use in ScriptSync
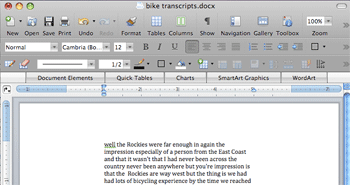 Once you have a solid transcript, you can right click (or option-click on a Mac) on the transcript in the metadata pane and select “Copy All” from the contextual menu. Now you can paste the contents of the transcription into any wordprocessor. If you use Word, you’ll want to save as a text file and insert line breaks. If you don’t, when you import the script, there will just be one VERY long line at the top. Another tip to make searches on the script easier is to limit the width of each line of the transcript. I changed the margins on my Word doc to make each line in my Word document about 4″ across which translated into about 3 or 4 seconds per line. Save each transcript as a separate script, or you could place all the transcripts into one lengthy script and match each interview to the correct portion of the transcript.
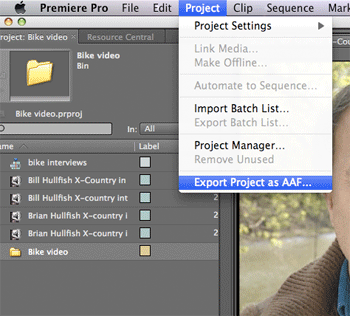 So you could argue that you may want to stay in Premiere to rough cut the interviews together. I wouldn’t argue that. If you choose that route, then you can actually set in and outpoints by clicking on words in the transcript and the video will jump to those points and you can set your points. Once you’ve built a rough cut of your interviews, you can export the rough sequence to Avid for further editing. There is a trick to this. I had to get help from my peeps at Adobe to figure out that instead of going to File > Export, you actually go to Project > Export Project as AAF. Then import it into Avid.
Syncing the script with Script Sync
In Avid, to import the script for ScriptSync, you choose File>New Script. This brings you to a dialog box where you are allowed to browse and bring in one script at a time. When each script is imported, they look kind of like little Applescript icons in your bin, but they function just like a regular bin. Opening one of them will reveal the text of your transcript and a series of controls at the top.
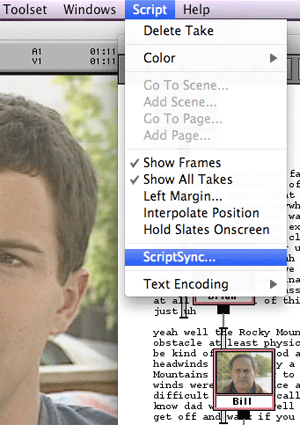 To link the words in the script to the words in the clip:
- Select the portion of the script that correlates to a specific clip. Lasso all the words that are in the clip.
- Drag and drop the clip onto the selected clip. This links that text to the clip.
- Now for the real magic: click on the small square at the bottom center of the thumbnail that is now next to the text and choose Script > ScriptSync. Very quickly the Avid associates all of the words in the text with their exact location in the clip.
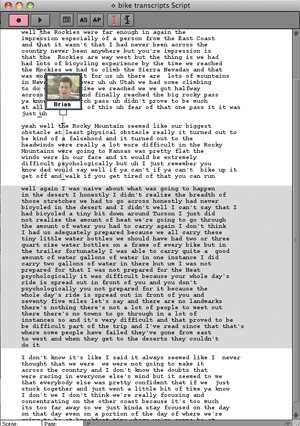 So, similar to Adobe Speech Search, you can click on a word in the text and the correct clip for that word will load into the source monitor and place the timeline locator and an inpoint at the exact location of the selected word.
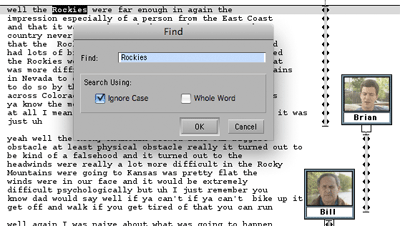 This is an amazingly fast way to navigate around. You can even use Command+F (Mac) or Control+F (Wintel) to instantly find any word in your transcript. Hitting Find again will jump to the next instance of the word in the transcript.
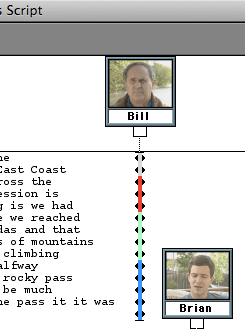 You can even color code sections of the script, possibly equating each color with the theme or idea or person or subject.
Once you find your shots using ScriptSync, the editing process is the same as usual. There are a lot more things to know about using ScriptSync with traditional “Hollywood” scripts and film making processes, but this is about all you need to know for documentary-type transcription scripts.

To see Avid’s video tutorials of ScriptSync in action, check out the following links:
http://www.avid.com/scriptsync/scriptSync_1.html
http://www.avid.com/scriptsync/scriptSync_2.html
http://www.avid.com/scriptsync/scriptSync_3.html
Skipping ScriptSync
The ScriptSync part of the equation here is really only needed if you want to edit in the Avid. If you are cool editing in Premiere Pro, then there are advantages to using the Speech Search feature to search through your clips. By staying in Adobe the whole time, or at least staying there once you’ve done the Speech Search process, you maintain the metadata of all of that transcribed text.
That metadata – to an editor – is really only good for finding the word you want quickly and using it to set your in and out points. But to a WEB person, it’s valuable, because Adobe tracks all of those words in the clips even AFTER they’re edited into a video and the faces are covered with b-roll and even AFTER they’re exported into one giant exported file and even AFTER they’re compressed and even AFTER they’re sent off to the web.
Why should you care? Because all of those words in your documentary or marketing video or whatever are SEARCHABLE via the web. Someday soon, hopefully Google and Yahoo will be able to search on those words embedded in your videos, but for now you can access them through a tool from Adobe. If you maintain your own website, or your client maintains their own website, then people on those sites can actually search for specific words in finished, edited pieces on those websites! How cool is that!
Check out this website that shows the concept. Just type a word that you’re looking for and you’ll see the sentence that includes the word and a yellow marker appears in the timeline showing where the word is in the video.
There’s also a piece here on ProVideoCoalition about this searchable video.
You can download the code to include in a website so that it can search Adobe-created videos. For some, this would be a powerful incentive for using Adobe to edit. You can also get this benefit by editing your video elsewhere and only doing the Speech Search on a finished edit. As long as the video stays in PremierePro between the Speech Search process and the export to the web, the video will be searchable by Adobe’s engine.
So that’s it! Lot’s of sweet, chocolatey goodness mixed with plenty of creamy peanut buttery love.

Filmtools
Filmmakers go-to destination for pre-production, production & post production equipment!
Shop Now


