Premiere Pro has a full complement of tonality and color correction tools including about 40 tonality and color correction video effects and four vector and waveform scopes. Most video editors gaze upon all those possibilities and end up choosing the path of least resistance: automated effects. As for scopes…forget about it. Who can make heads or tails of them? Turns out, the dark art of color correction is not all that opaque.
It’s a good idea to use color correction tools on most, if not all of your projects. Your videos will look better and your family, friends, and clients will appreciate the improvements.
In this tutorial I show you how to do all of your so-called primary color correction work using only one video effect and two scopes. Primary color correction changes the tonality and color of an entire clip. You use secondary color correction techniques to change tonality and color in areas within a clip’s frame.
This tutorial will cover primary color correction. At its most basic, primary color correction is a two-step process: first adjust tonality – brightness and contrast. And second, fix the color cast (if there is one).
Organizing the workspace
Setting up a workspace for color correction – both software and hardware – will lead to more consistent results. On the hardware side, you need a reasonably good LCD or plasma monitor. Set your monitor display to 6,500 degrees Kelvin (the standard video editing display, color temperature for most of the world) or 9,300 degrees Kelvin for those working in East Asia.
It used to be that if you were working with video that would appear on TV screens, it was a good idea to add a video monitor to your workspace. I think that is no longer the case. It’s difficult to match color calibration on different monitor makes and models and clients might prefer what they see on your PC monitor versus what shows up in the playback monitor.
It’s best to work in an environment where the lighting doesn’t change (no windows), use lights that match the color temperature of your monitor, and put a neutral gray, wall covering behind your monitor. As you work, briefly look away from your monitors, and regularly take longer eyeball breaks.
On the software side, Premiere Pro has a preset workspace called Color Correction. That is a good starting point when working with tonality and color. Switch to that workspace by choosing Window > Workspace > Color Correction. Doing so adds a Reference Monitor to the workspace. “Gang” the Reference Monitor to the Program Monitor by clicking the button at the bottom of the Reference Monitor (see below). In that way, when you work with a scope in the Reference Monitor, it will display the data from whatever frame is visible in the Program Monitor.
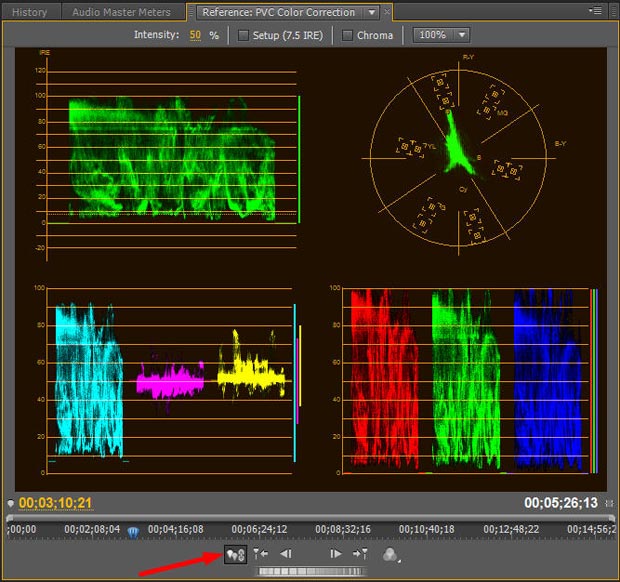
“Gang” the Reference Monitor to the Program Monitor by clicking the highlighted button. Then the scopes will display data from the clip frame currently being displayed in the Program Monitor.
Understanding tonality and the YC Waveform scope
Maximizing the breadth of tonality usually is your first objective and might be all you need to do to make dull videos dazzle. Your goal is to give your clips a complete tonal range by making sure the darkest shadows are pure black and the brightest highlights are pure white. There are exceptions to this approach, notably when working with videos shot in fog or softly lit interiors. In any event, your final tonality step is to adjust the midtones (gamma) to create a pleasing contrast.
When adjusting tonality, use the YC Waveform scope (Y=luma, C=chroma) to evaluate the changes. To display that scope, open the Reference Monitor menu (shown below) and choose YC Waveform.
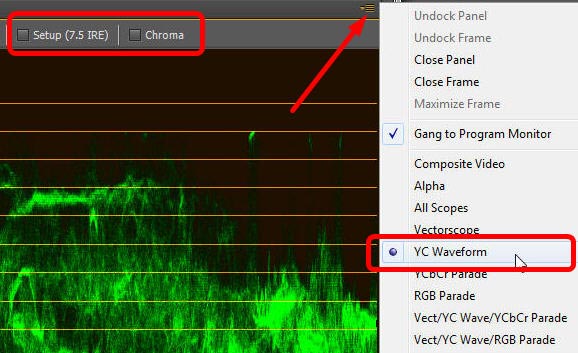
Open the YC Waveform scope from the Reference Monitor menu. Uncheck Setup (7.5 IRE) and Chroma.
With the YC Waveform scope open, uncheck Chroma (there is no need to display the color values) and uncheck Setup (7.5) IRE as shown above. That latter control limits the data display to so-called “broadcast safe” zones above 7.5 IRE (Institute of Radio Engineers) units. Zero IRE is absolute black and 100 IRE is absolute white. Adjusting the darkest areas of your video to 7.5 IRE would cause them to look dark gray instead of pure black and would create an overall low contrast look to your clips. (Editor’s Note: See this older article on Luminance Ranges in Video for more on black, white, digital values, and IRE settings.)
The “broadcast safe” issue no longer has much weight due to the switch to digital broadcasting and the move away from CRT TV sets. The main thing now is to avoid having your video drop below 0 IRE or climb above 100 IRE. But even that is not a hard and fast rule. I contacted five San Francisco TV stations and two national programming and advertising distributors and they confirmed my take on this.
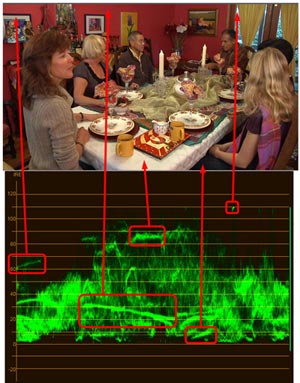 The YC Waveform scope displays luma values horizontally across your clip. The figure at right gives you a feeling for how that waveform graph works. Brighter areas within the clip are displayed toward the top of the waveform graph, darker toward the bottom.
YC Waveform luma graph areas of interest and their associated locations in the clip.
Adjusting tonality with the Fast Color Corrector effect
To streamline and simplify your workflow, I recommend you work with only one video effect to do virtually all of your primary color correction work: the Fast Color Corrector (in the Color Correction video effects bin). That’s not to say the Fast Color Corrector is the only color correction oriented effect worth using. In my lynda.com tutorial – “Premiere Pro: Color Correction and Enhancement” – I recommend editors work with four video effects for all of their primary color correction work and some secondary work: Fast Color Corrector, Three-way Color Corrector, RGB Color Corrector, and RGB Curves. I also suggest working with six other effects for some secondary color correction and color enhancement work: Change to Color, Crop, Leave Color, Paint Bucket, Tint, and Track Matte Key.
The Fast Color Corrector has several properties and a color wheel. To do tonality work, you use the Fast Color Corrector’s levels sliders, as shown in the figure below. I cover the color wheel later in this tutorial.
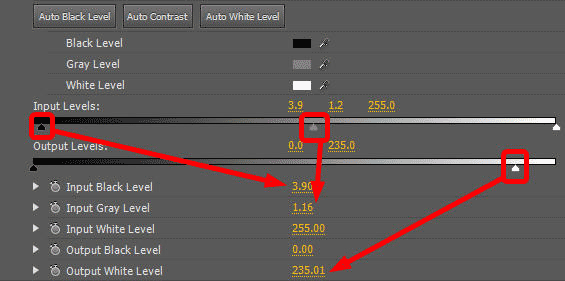
The levels slider controls in the Fast Color Corrector are similar to those found in the Levels effect in Photoshop.
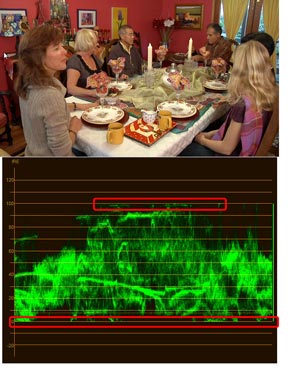 If you’ve used the Levels effect in Photoshop, the levels sliders in the Fast Color Corrector will look familiar. Your goal is to adjust the tonality to have the bottom of the graph in the YC Waveform – the shadows – just rest on the 0 IRE Line and the top of the graph – the highlights – just touch the 100 IRE line, as shown in the figure at right.
Note: The Auto Black, Auto Contrast and Auto White buttons do not work properly. That is a bug known to Adobe. You can use the Black, Gray, and White Level eyedroppers to set preliminary levels, but you will want to fine tune your selections with the levels sliders anyway, so I don’t use those tools.
As you make tonality adjustments, you can see your results in the YC Waveform scope. Your goal is to have the shadows – the bottom of the graph – rest on the 0 IRE line and the highlights – the top of the graph – just touch the 100 IRE line.
First adjust the shadows. In most video clips, shadow values – the bottom of the waveform graph – will start out slightly above the zero IRE line. To move the shadows down, drag the Input Levels black triangle to the right. If your clip’s black levels start out below the zero IRE line, move the bottom of the graph up. To do that, drag the Output Levels black triangle to the right. As you move the sliders the changing values show up in the numeric readouts below the sliders, as shown a couple of figures earlier.
Next, adjust the highlights. Depending on your camcorder and the exposure settings you used, the highlights in your clips – the top of the waveform graph – are just as likely to start out above the 100 IRE line as they are to be below it. Most HD camcorders record “super whites.” These are bright areas from 100 IRE to 110 IRE that still have some detail in them that will become visible once you adjust the tonality. To move super white highlights down, which will reveal those details, move the Output Levels white triangle to the left. If your clip’s highlights start out below the 100 IRE line, move them up by dragging the Input Levels white triangle to the left.
Finally, to adjust the midtones, move the Input Levels gray triangle (in the middle of the top slider) to create an overall luminance that suits your purposes.
Using other types of tonality controls
There are two other approaches to adjusting overall tonality: curves or Pedestal/Gain/Gamma controls. Either can be as effective and intuitive as the levels controls in the Fast Color Corrector. That said, I rely almost exclusively on the Fast Color Corrector’s level controls but sometimes use curves because they let me limit my tonality adjustment to a narrow tonality range. Several effects incorporate these methodologies; I recommend you use only two: RGB Curves and RGB Color Corrector.
Using the RGB Curves effect
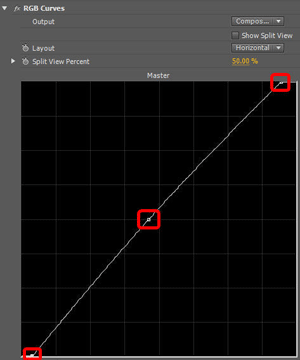
If you’ve worked with Curves in Photoshop, then the RGB Curves video effect will look familiar. You use its master graph to adjust tonality.
First adjust shadows. To move the bottom of the YC Waveform graph down, drag the point at the bottom left corner of the RGB Curves Master graph line to the right (as shown at right). To lift the shadows – to move the bottom of the waveform graph up – drag the point up.
Next adjust the highlights. To move the top of the waveform down, drag the point at the top right corner of the RGB Curves Master graph line down. To lift the highlights drag the point to the left.
In the RGB Curves effect, move the points at the bottom left and upper right to adjust the shadows and highlights. Add a point in the middle and move it to adjust the midtones.
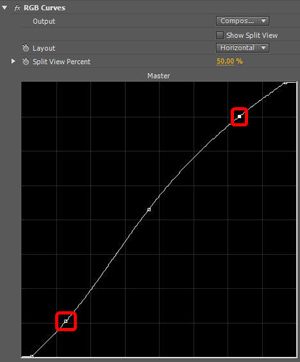 To adjust the Gamma, click near the center of the graph line to add a single point, and then drag it to change the overall contrast: up to make the clip brighter or down to darken it.
To give your clip more punch, add two more points to the line; one near the bottom and another near the top. Then slightly drag the bottom point down and the top point up, giving your line the wavy shape shown in the figure at right.
To further adjust contrast, place two more points on the RGB Curves effect Master control graph and drag them up or down to suit your purposes.
Using the RGB Color Corrector effect
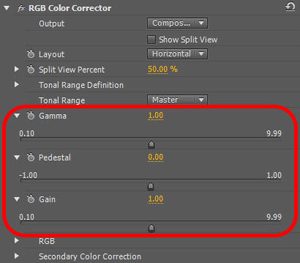
The RGB Color Corrector (shown at right) has a number of properties but only three are used to adjust overall tonality: Pedestal, Gain, and Gamma.
The RGB Color Corrector effect and its three sliders that control Gamma (midtones), Pedestal (overall luma) and Gain (highlights).
They function slightly differently than levels and curves controls. Pedestal changes the overall luminance of a clip while Gain is limited primarily to the highlights.
Use Pedestal to first to move the waveform graph so the bottom rests on the 0 IRE line. Use Gain to move the highlights to the 100 IRE line. Then adjust Gamma.
Note: As you adjust these three values, the luma graph in the YC Waveform scope at the 0 or 100 levels might shift slightly. If so, tweak the Pedestal and then the Gain to complete your tonality adjustments.
Checking color and saturation with the Vectorscope
 If you set a proper color balance in the field, your clips probably won’t have obvious color casts. But your eyes can play tricks on you, so it’s good to check your clips’ color using the Vectorscope.
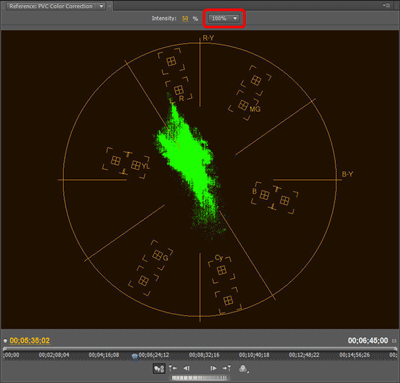
In the Reference monitor, open the panel menu and choose Vectorscope. This scope shows hue and saturation values in your clip. Choose 100% from the drop-down list (shown at right). That displays the full range of saturation values; from 0% at the center of the scope to 100% at the circumference.
The Vectorscope displays hue and saturation information. Set its display to 100% to show saturation values from zero to 100%.
To get a feel for how the Vectorscope works, create a color bars clip (choose File > New > Bars and Tone), add that to a sequence, and position the Current Time Indicator on it. In the Vectorscope, the color bars show up as dots in the three primary color boxes – red, green, and blue – and in their complementary (secondary) colors – cyan, magenta, and yellow, as seen below:
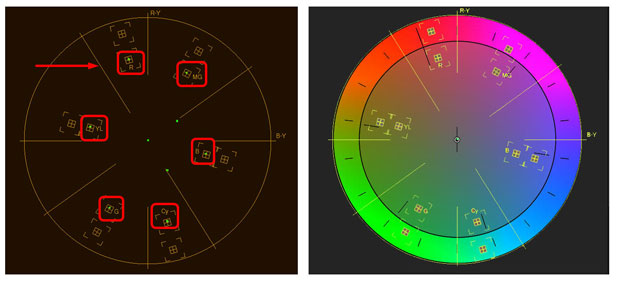
The Vectorscope (above left) matches the color wheel in terms of color angles. In this example the Vectorscope shows how color bars look. Each color shows up as a dot in its respective color box (the inner boxes represent 75% saturation). The arrow points to the so-called “flesh tone” line.
Note: All the black, white and gray areas in the clip show up as a single dot in the center. They are all desaturated – neutral – so they all fall in the center.
In the Vectorscope there are two sets of color boxes at two distances from the center point. The color bar dots show up in the boxes closest to the center – the 75% saturation zone – which meets the now outdated, broadcast safe standards. However, as with luminance, you don’t have to limit your clips to outdated values.
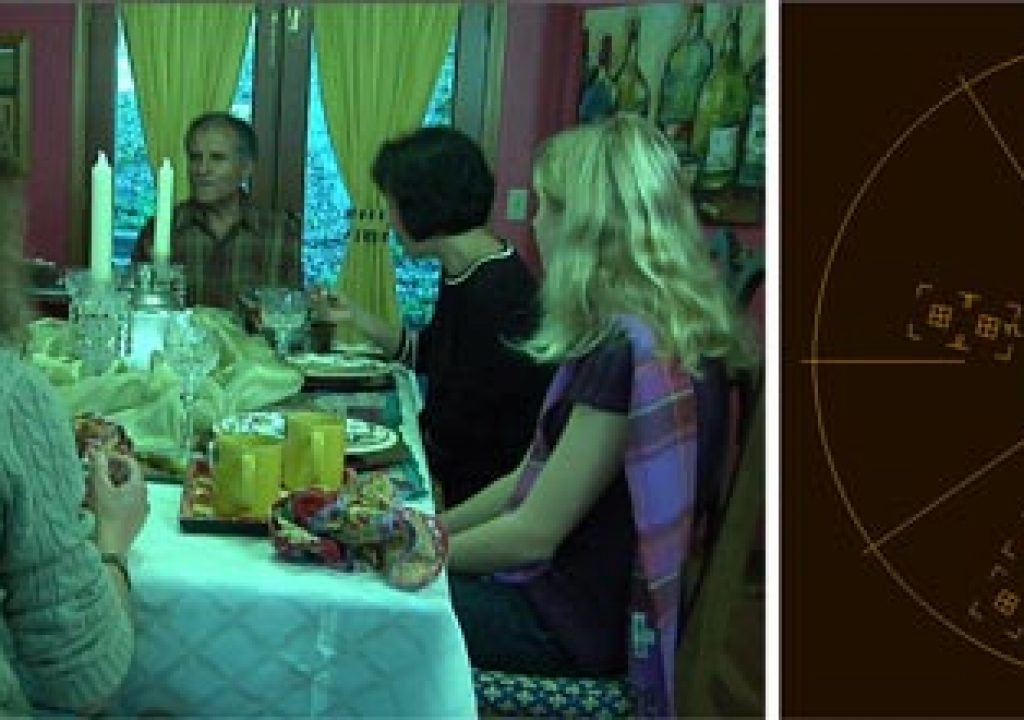
To demonstrate how an obvious color cast looks in the Vectorscope, I shot the clip in the figure below after taking my color (white) balance from the red wall. That shifted the color cast to the complement of red: cyan. In the figure below, the Vectorscope shows how the colors in the clip are clearly shifted down toward cyan:
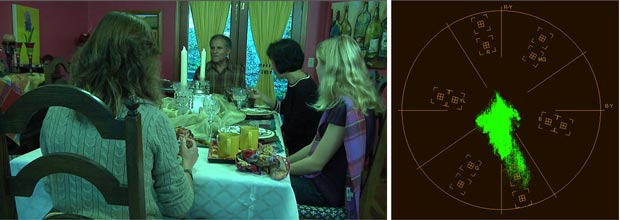
The clip has an obvious cyan color cast caused by taking the color balance from the red wall. That color cast shows up in the Vectorscope.
If the color cast is not so obvious, you can get a clearer idea of the cast by limiting the display to a portion of the clip that you know should either be neutral (light gray is best) or flesh tone. To do that, add the Crop effect to the clip and adjust it so it displays only a portion of the clip you want to use to check color cast.
If the clip is properly color balanced and you are viewing a neutral gray area, the Vectorscope trace will be in the center. If the trace is some distance from the center, some color correction is in order.
To check flesh tones, I crop to an individual’s face. Despite the three nationalities represented at the table back on the previous two pages, the Vectorscope sees their flesh tone hues more or less equally due to the red color of blood just beneath the skin. If the Vectorscope trace falls on or close to the so-called flesh tone line, then we’re in good shape.
Adjusting color cast using the Fast Color Corrector
Once you determine the color cast, use can use the Fast Color Corrector’s color wheel to fix it. The color wheel controls hue and saturation for all luminance levels.
Note: The Three-way Color Corrector has four wheels; one each for shadows, midtones and highlights and a fourth “master” wheel that works more or less like the single wheel in the Fast Color Corrector. You use the Three-way Color Corrector’s multiple color wheels when doing secondary color correction.
To remove a color cast, drag the Fast Color Corrector, color wheel’s Balance Magnitude control (the little circle) away from the color cast and toward its complementary color. The farther you drag it, the greater the color shift. The small hash mark, perpendicular to the Balance Angle line, called Balance Gain, sets the relative coarseness or fineness of the Balance Magnitude control.
To fix the cyan color cast in the figure above, I pulled the Balance Magnitude control away from cyan toward red, its complementary color (as shown in the figure below). To check my work, I used the Crop effect to isolate a neutral gray area. In this case, I used the table cloth hanging down from the table as my neutral gray (the tablecloth on the table surface is too bright to get an accurate color cast reading). As you move the color wheel Balance Magnitude control, the goal is to see to it that the Vectorscope trace moves to the center of the scope, meaning you’ve neutralized the color cast.
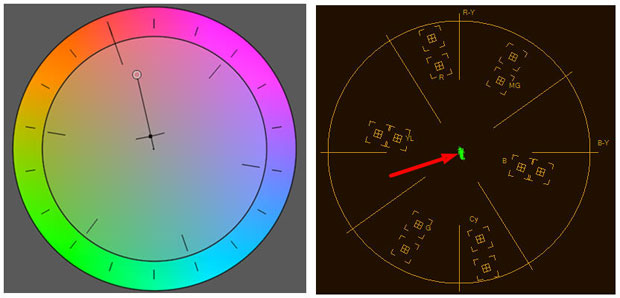
To remove a color cast, drag the Fast Color Corrector, color wheel’s, Color Magnitude control away from that color. To check your work, use the Crop effect to limit the display to what should be a neutral gray region in the clip. In this case I neutralized a cyan color cast. As I dragged the Color Magnitude control, the Vectorscope trace moved from cyan (toward the bottom right of the scope) to a neutral, unsaturated color (center of the scope).
I also check flesh tones to see if they fall on the so-called flesh tone line (highlighted in the second figure on this page). After fixing the color cast in the clip of the family seated around the table, the flesh tones ended up being only a few degrees off the flesh tone line (shown below). So instead of using the Balance Magnitude control, I rotated the Hue Angle, the outer wheel, counterclockwise a few degrees to rotate the flesh tone to the line.
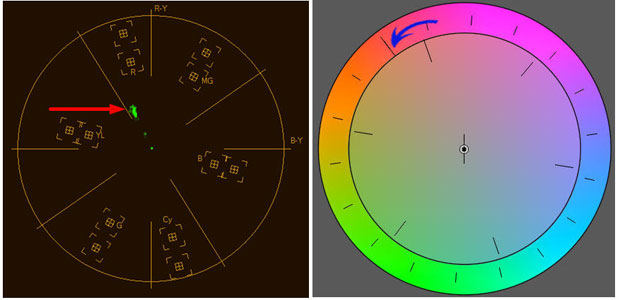
Using the Crop effect to isolate flesh tone showed values just a few degrees away from the Vectorscope flesh tone line. Simply rotating the color wheel Hue Angle toward the flesh tone line, corrected that issue.
Taking color correction further – secondary color correction
Fixing tonality and color within the entire clip frame might be all you need to do. But sometimes you want to adjust tonality on areas within the frame of the clip, so-called secondary color correction. Secondary color correction is a topic for a much longer tutorial. To get a sense for how that works, take a look at the bottom of the RGB Color Corrector, RGB Curves, or the Three-way Color Corrector effect. Each offers Secondary Color Correction controls that let you select regions in a clip based on hue, saturation and luma. Once selected you can limit your tonality and color correction work to only those regions.
In addition, the RGB Color Corrector and the Three-way Color Corrector let you define the tonal range. That is, instead of letting those effects automatically determine which areas are considered shadows, midtones and highlights, you can make that judgment call. In that way, you can fine tune your tonality and color adjustments.
No matter how carefully you adjust the tonality definition and secondary color correction controls, some parts of the clip you don’t want to change might end up being in the selected regions. In those cases, you can use a graphic coupled with the Track Matte Key video effect to further isolate the regions you want to fix. I explain how to do that and other secondary color correction methods in my lynda.com tutorial: “Premiere Pro: Color Correction and Enhancement.”
Whether you choose to use secondary color correction tools, it’s always a good idea to make primary color correction – tonality and color cast adjustments – a regular part of your video editing workflow.
Jeff Sengstack is a lynda.com author. His latest tutorial series, “Premiere Pro: Color Correction and Enhancement,” is scheduled for release in September, 2011. He has worked with Adobe Systems in the past, but currently does not receive any compensation with Adobe.

Filmtools
Filmmakers go-to destination for pre-production, production & post production equipment!
Shop Now