A couple of months ago I was offered the opportunity to test out the NVIDIA Quadro FX 4800 for Mac. This beast of a video card is one of the more powerful cards available for the Macintosh but it’s also quite expensive (currently just over $1,400 at Amazon). I jumped at the opportunity as it’s this NVIDIA technology that powers the Mercury Playback engine in Adobe Premiere Pro CS5. That and the fact that I probably wouldn’t have been able to justify the cost of the card on my own. In short, the Mercury engine and the NVIDIA Cuda technology combine for some very fast editing of very processor intensive formats. Since then, this particular graphics card has become the backbone of another hot Mac product, the DaVinci Resolve for Mac.
Let me first say that I’ve been at a bit of a loss as to how to exactly test / benchmark / review the 4800. I certainly consider myself geeky enough to closely follow and understand a lot of the computer technology we have to use in post-production but I’m not geeky enough (nor do I have any desire to be geeky enough) to spend hours running benchmark tests on graphics cards, hard drives and things like that. That’s what Barefeats is for and they’ve done their own Quadro FX 4800 for Mac tests. Ars Technica too. While I most certainly care about all the changing technology I often get to the point where I don’t want to know the deep technical details as to how something many work, I just want to that it does indeed work and how that will help my post-prodcution workflow. So how to discuss the 4800?
Bruce is a PC, I’m a Mac.
Fellow PVC writer Bruce Johnson has been writing about the PC version of this card and his workflow with Adobe Premiere Pro CS5. I thought that I would mirror one of his posts with the Mac version since there’s probably quite a few people getting 4800’s of their own as they begin setting up DaVinci Resolve for Mac.
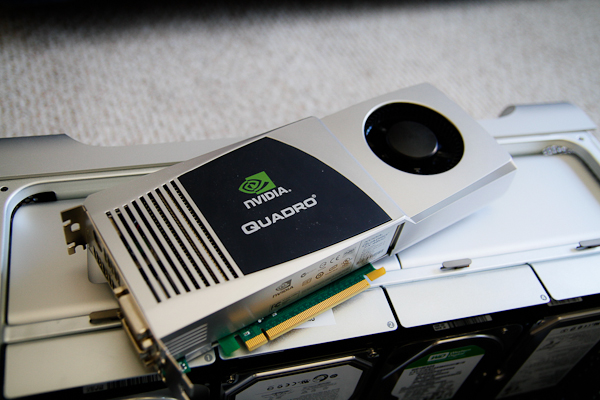
The NVIDIA Quadro FX 4800 for Mac.
This card is big! It’s about 10.5 inches long and about an inch and a half wide so it takes up all of the space in the doublewide slot 1 of the Mac Pro. It doesn’t really look like you’d be able to get a card in slot 2 once the thing was installed but you can. One thing to be sure of (and one thing that was asked of me) is that you are running a supported Mac Pro. If you check the System Profiler you can check exactly which model you are running.
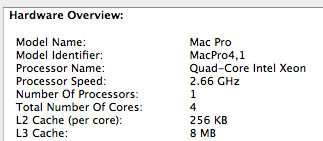
About This Mac > More Info will launch the System Profiler so you can check for your specific version of MacPro
Not all Mac Pro’s are supported for the 4800. Older Mac Pros before 2008 aren’t supported. Full details are on the NVIDIA 4800 for Mac driver page. My model is 4,1 which is supported. If you’re planning on setting up a Resolve system make sure you have a supported model before buying. If you’re planning to run DaVinci Resolve and have a supported system for that software then your machine is supported for a 4800. There’s a good list of Macs and the Model Identifier numbers on Everymac that helps understand all of these little numbers a bit better.
The card has to get external power so you’ll need the power cable to get up and running. There’s two small power outlets on the motherboard and the 4800 will plug into one of those.
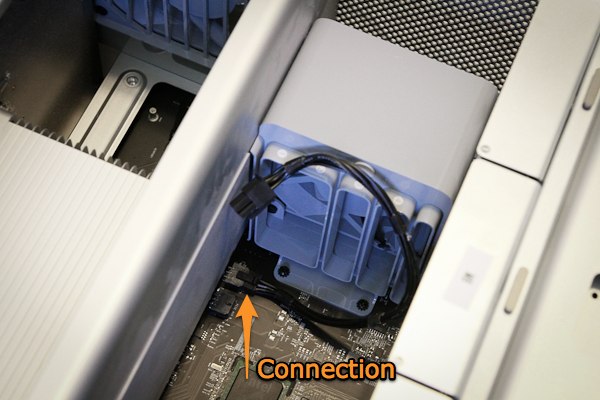
The 4800 power cable plugged into the power outlet on the Mac Pro motherboard
The Mac Pro really is elegant in its internal design so removing components (RAM, hard drives, PCI cards) is a breeze. Back to that early statement about how geeky I am; I’m more than happy to snap open and work with the user serviceable internals of the Mac Pro but looking at a few of the pictures of the PC that Bruce works with makes me very happy that Macs aren’t designed that way. If they were any more difficult to service I might let someone else do it.
Removing the access door is as simple as popping the latch on the back of the Mac Pro. There’s two thumb screws that have to be unscrewed to remove the bracket that secures the PCI cards once they are inserted. They key to removing a PCI card it to slide the latching bar out of the way so the cards can be removed. You can see the silver metal bar running across the motherboard:
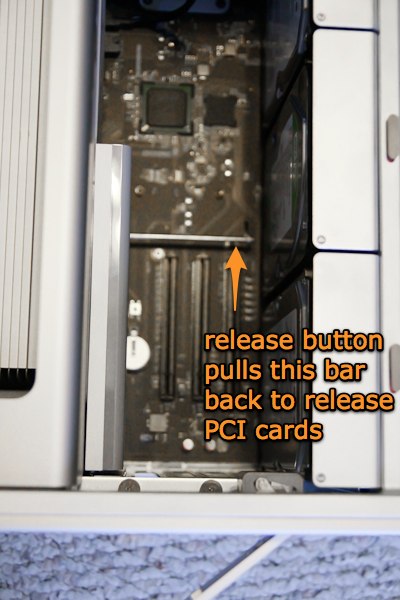
To slide it out of the way push the button on the plastic shroud that covers the rear PCI slot holders:
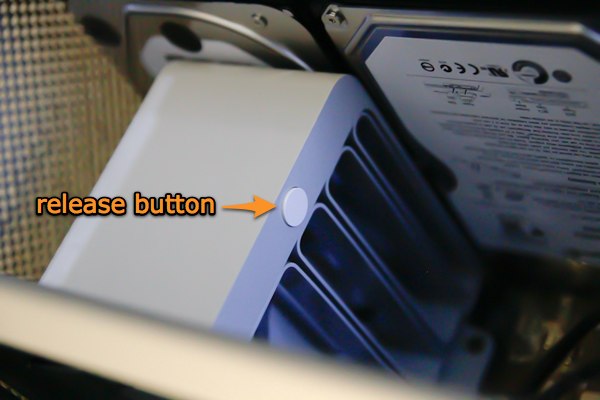
This allows you to slide the whole shroud back which releases the latching bar. It took me a while to figure this one out when I went to install my first card in a Mac Pro. Then it’s a matter of pulling the card straight up out of its slot. If inserting a new card line up the bottom of the card and push it straight into the slot until it seats.
The 4800 is big so it’s obvious it fits into slot 1, the doublewide slot. I found it easiest to attach the power cable to the motherboard first, then attach the other end of the power cable to the card itself and then insert it into the slot. If you’re setting up for DaVinci Resolve then you’ll insert your second video card into slot 2. It’s tight but it fits.
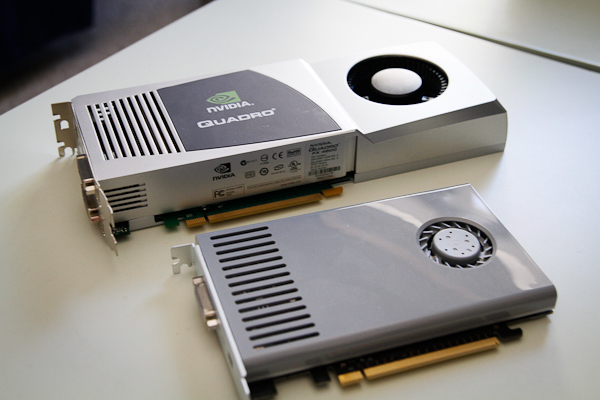
The Quadro FX 4800 for Mac and GeForce 120 side by side.
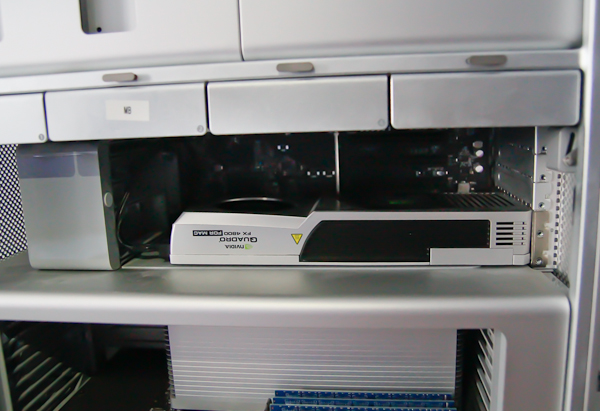
The 4800 card installed.
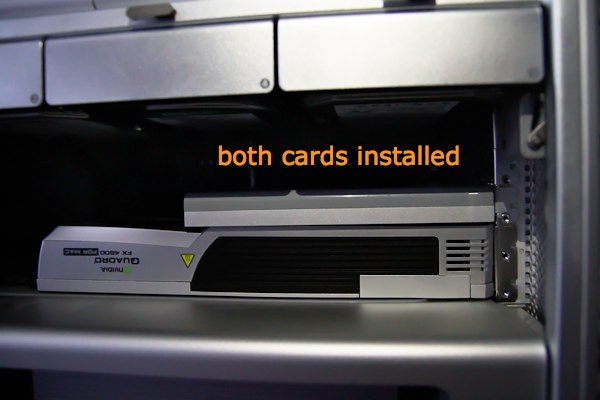
Both the 4800 and GT 120 installed.
For a proper Resolve configuration there’s two other cards to insert as well so it’s going to be a full computer once all the cards are in place. There’s two drivers that need to be installed for the 4800, both the card’s Mac driver and the CUDA driver. Check the NVIDIA site and make sure you’re on the right os version.
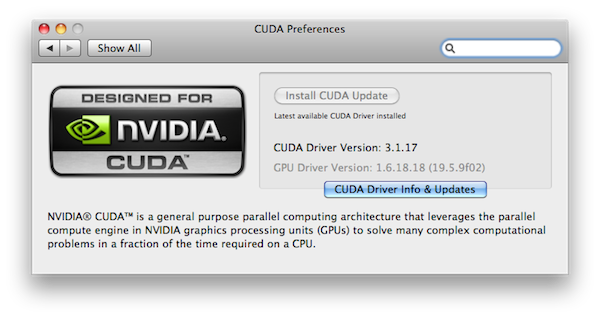
Once everything is installed, connect the monitor and you’re ready to go.
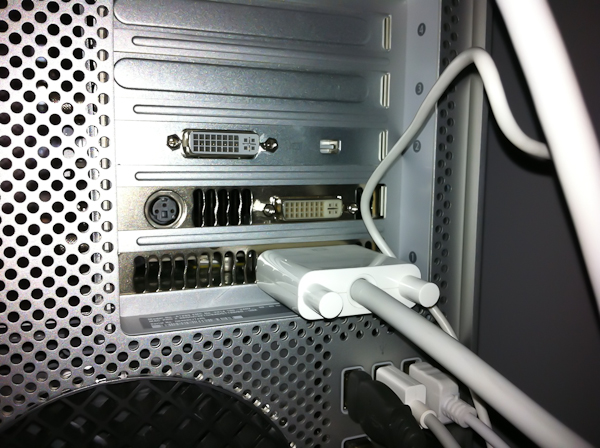
The connections on the Mac Pro with both video cards installed.
What you’ll see in the image above is the back of the Mac Pro and the graphics card connection with both the 4800 and GT 120 installed. I’ve connected my display to the 4800 as I’m working with Premiere Pro CS5 as of this writing with no Resolve for Mac installed. If you’re setting up a recommended Resolve for Mac configuration you’ll be connecting your monitor to the GT 120 card as that drives the GUI for the software and the 4800 does all the processing for everything else. You’ll also have PCI cards in the other two slots. Notice I said recommended as there are people who are running Resolve for Mac with only the 4800 card. You’ll get less realtime performance but also won’t have to swap monitor cables depending on what application you might be working in.
This leads to an interesting question: How well will a DaVinci Resolve for Mac system lend itself to sharing a computer with other applications like Final Cut Pro, Media Composer or the Adobe CS5 suite? Considering Resolve for Mac has some strict system requirements this will be something that has to be tested out as Resolve gets out in the market. There’s also often strict requirements for drivers where one application might require one version and another application a totally different version. One thing you can be sure of is that at $995 there will be a lot of people buying Resolve for Mac who will be running the application with lots of other software installed and not necessarily be set up with the recommended Resolve configuration. Stay tuned to the Internet for those reports.
Next Up: The 4800 with Premiere Pro CS5.
The 4800 with Premiere Pro CS5.
In case you missed it, Adobe introduced the Mercury Playback engine with the release of Premiere Pro CS5. While it doesn’t have to have a supported graphics card for acceleration it really helps. If you just want to talk about strict playback performance with the NVIDIA card and the Mercury Playback engine then my though was to toss a very processor intensive codec into the timeline and just start applying effects until it chokes. And what better type of clip to test than a native Canon H.264 clip from the 7D? This clip was stored on an 2-drive internal striped RAID created with the Apple Disk Utility. Will faster drives yield better playback performance? Probably. A native RED .r3d at 4K would be a more taxing overall but the first thing most people ask about is usually Canon clips.
I first setup the PPro project and the test clip with my Mac Pro’s stock NVIDIA GeForce GT 120. I figured I’d tax this card out and then install the 4800.
The stock GeForce GT 120
I took a 30 second, 1920×1080, 23.98 H.264 .mov and created a new PPro CS5 sequence by dragging that clip to the new sequence icon in PPro to allow it to create the sequence that best matches the codec. The single clip showed a yellow render bar in the PPro timeline. Yellow indicates realtime playback and it easily plays backs and scrubs.

The Premiere Pro CS5 render bars.
Next it was time to start piling on effects. I first added an RGB Curves effects and applied a standard s-curve to give the footage a nice look. I seem to gravitate toward the RGB Curves in PPro as the built in Three-Way Color Corrector’s control is just too convoluted for my tastes. The clip then indicated a red render bar meaning it might need rendering but it still played back just fine, no stuttering playback. FYI, PPro does drop frames when it encounters playback issues but instead of popping up a warning like FCP (which can be turned off in FCP) it begins to stutter playback. The slower the playback the more trouble it’s having keeping up with the current media. I really wish PPro had a current frame rate indicator like After Effects has just to monitor exactly what you are getting. You can enable an overlay with current FPS via the console but to covers the entire monitor with info and isn’t intended for editing.
As for piling on filters: after RGB Curves came Timecode to generate a BITC (that’s got to take some horse power). Then I added the Noise filter and cranked that up followed by a Horizontal Flip. All of these effects are Mercury accelerated effects which is indicated by the Accelerated Effects icon in the PPro Effects palette. Click that icon and only Mercury accelerated effects are displayed.
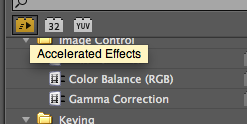
Accelerated Effects are indicated by the above icon. Click the icon in the Effects Palette and only the accelerated effects are shown.
Playback was still full frame rate. Sometimes when it hit play PPro would stutter just a bit but then it would ramp to full fps. That’s a testament to the Mercury Playback engine that it’s got 4 intensive effects on a native H.264 clip and it’s playing it fine.
To really tax it out I then duplicated that entire clip, resized it to 25% to make a picture-in-picture (I adjusted the RGB Curves to make it red) and hit play. After a couple of seconds of realtime playback PPro choked and the fps dropped considerably. That must mean it hit Mercury’s limit.
The Quadro FX 4800 for Mac
Now it was time to try the NVIDIA Quadro 4800 for Mac so it was time to install the card per the earlier discussion. Once PPro is running you can toggle the hardware acceleration on or off via the Video Rendering and Playback setting under the Project > Project Settings > General menu:

When I got the 4800 card installed and PPro booted back up I realized something: while doing the above testing with the GT 120 I had the Premiere Pro Playback Resolution set to 1/2. There’s no indicator of this without checking via the Output button and the Program monitor didn’t look like it was set to 1/2 resolution so I never realized it!
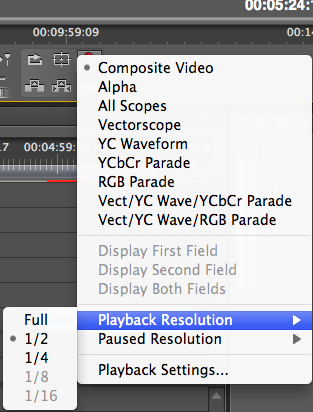
Playback Resolution can be set with the Output button under the Program monitor.
With the 4800 installed I began the above test at Full resolution with GPU acceleration. After about 4 total layers (3 picture in pictures) with RGB Curves, timecode, noise and a Horizontal Flip I began to experience dropped frames during playback:
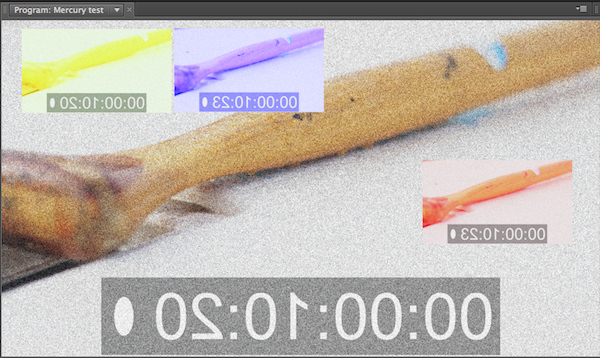
That’s some pretty amazing performance if you look at that closely. It was playing 3 streams of 1920×1080 H.264 in realtime with color correction, noise, BITC and a horizontal flip at full resolution. Only when that 4th stream was added (the blue PIP above) did playback begin to suffer. Since I had unbeknownst to me been working at 1/2 resolution I decided I would set the resolution to 1/2 and see just how far the GPU acceleration would go with the 4800. I got to the image below with 9 layers and all the above mentioned effects and saw no hit in playback performance.
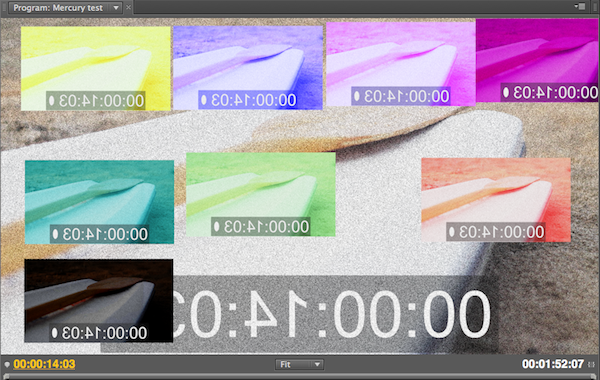
The image at 1/2 Resolution looked very good (indistinguishable from Full on my Program monitor) so you could easily perform an edit at 1/2 rez and see truly staggering performance. I wanted to be sure I tried a similar test at Full Playback resolution with the 4800 installed and I was able get some 9 layers to playback in realtime with just a basic color correction and text layer applied.
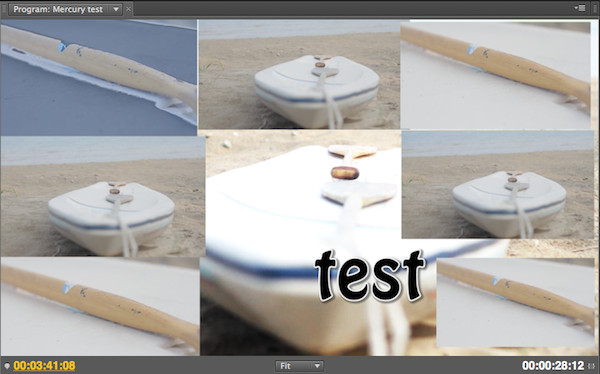
That’s some amazing realtime playback performance and far beyond anything I would ever attempt in everyday editing. Knowing that it had to max out somewhere at 1/2 Resolution I nested all 9 layers and added some heavy duty effects like Dust & Scratches and Lighting Effects. Only then did the playback, predictably, grind to a halt. But applying even more accelerated effects to the nest (Black and White, Tint, Levels, and an Ultra Key) didn’t phase playback or generate a red render bar. Again, at 1/2 Playback resolution but quite amazing.
On a second clip I thought I’d try a single, popular non-accelerated effect. Since I shot these 7D clips with a flat picture style they needed a basic look so I hit the big guns and applied Magic Bullet Looks. I tweaked a preset, hit play and watched as the software only Mercury playback began to choke. That’s understandable as Magic Bullet Looks is a very intense effect, both for playback and render. So I tossed Looks aside, applied Magic Bullet Colorista II and made my own similar look and it was able to hold full frame playback at full rez for the 30 second duration of the clip. As a second comparison I tried the clip with the new Boris BCC 3-Way Color Grade (also an unaccelerated effect) and performance was okay but it did begin to stutter on playback.
I then dropped the PPro playback resolution to 1/2 to give it a try. Applying a few more un-accelerated effects to these clips (like an animated Lens Flare and Wave Warp) didn’t affect the playback at all, both held a full 24 fps. I did notice an interesting thing with the CPU. For the most part, watching the CPU usage meters that I had installed from MenuMeters showed very different CPU usage between accelerated and unaccelerated effects. The filter stack of unaccelerated effects pegged all the cores full for duration of playback:
![]()
For the GPU accelerated effects the CPU cores would fluctuate during playback but after an initial full spike they weren’t being fully used:
![]()
This was especially evident when playing at Full Resolution. At 1/2 Resolution the GPU accelerated filter stack hardly made the CPU meters move at all. It would seem Adobe has built the Mercury Playback Engine to make full use of all the system resources when playback isn’t being hardware accelerated. That’s great if you don’t have a supported NVIDIA card as it seems to use all the CPU power that you have.
Next Up: Exporting in PPro and rendering in Final Cut Pro
H.264 exporting in Premiere Pro
I also wanted to see how much the 4800 card might speed up a simple H.264 export like I might send for client approvals. An iPhone preset is one of my favorites so I exported a 32 second clip. Both software and GPU acceleration took about 28 seconds. I was surprised at those results as I thought that the GPU acceleration was supposed to speed up encoding as well. The NVIDIA reviewer’s guide suggests using a Blu-ray preset as an encoding test. With that preset I tried a one minute clip and software encoded in 53 seconds while the GPU acceleration encoded in 39 seconds. I also tried tried that same one minute with an H.264 Vimeo HD preset. Software only: 1:03 – GPU accelerated: 36 seconds. That was was more like it as the GPU accelerated encode was much faster. I’m not real sure what the deal is with these exports. Sometimes the 4800 seemed to accelerate the export, sometimes it didn’t.
Rendering Colorista II in FCP, playback in Motion
One other comparison I wanted to try out was a Colorista II rendering option between the GeForce 120 and the 4800. For this test I loaded up Final Cut Pro. Colorista II takes advantage of your system’s GPU for rendering and you can choose to render using the CPU or the GPU. Here’s the control from FCP:

I took a 22 second 1920×1080 ProRes (LT) clip in Final Cut Pro, applied a basic look with Colorista II and hit render. Render Using CPU: 2 minutes 41 seconds. Render Using GPU (with the GeForce 120): 1:25. Render Using GPU (with the Quadro FX4800 for Mac): 1:39. Not much difference in the two card’s rendering times under that test.
Next I tried a completely subjective test with Apple Motion. With the GeForce 120 installed I brought up the Directions.HD template. Working at Full resolution and Normal quality Motion played back the template just fine at full fps. But when I started adding clips, to the Drop Zone as well as new clips, playback started to suffer.
With the 4800 playback would begin to suffer as I added more ProRes clips to the template as well. It felt like I did get better performance while adding clips out of the 4800 than I did the 120 but it wasn’t a night and day difference. I have completed two Motion projects (both moderately complex 2D motion graphics projects) with the 4800 card installed and performance was great there, playback never an issue.
Wrap-up
To really take full advantage of a fast GPU, software has to be specifically written to utilize it. This is exactly what Adobe has done with the Mercury Playback engine, optimizing it to support the NVIDIA CUDA technology. The performance really is quite amazing, as was expected, but I have to admit that I was quite stunned by just how much realtime performance I got when the Premiere Pro CS5 Program monitor playback resolution was dropped to 1/2. You really could see a no-render situation for offline edit. I do wonder exactly what the quality difference on an external client monitor might be between the Full and 1/2 resolution setting but for basic creative offline editing it looked pretty good at 1/2. When viewing the Program monitor full screen I could begin to see the resolution difference but for offline it would have been more than acceptable. The Mercury Playback engine is a great example of what can be achieved when writing for the GPU. I’ve read an article or two about the 4800 and PPro CS5 that says you can add all the effects and layers you want and never see a hit in real time performance or resolution. That wasn’t entirely true in my tests as full resolution did begin to see performance hits as I added layers and effects to native Canon H.264. But as I’ve said, the 1/2 Resolution playback setting was stunning in playback performance and looked great on the Program monitor. There’s so many different possible combinations of computers and footage that I’m sure performance will vary from situation to situation. No card is powerful enough to accelerate everything, all the time … at least not at this level and price point.
The GPU really is a way to extend the performance of our computers. Apple built their GPU technology, OpenCL, into Snow Leopard but as of right now I don’t think anything really takes much advantage of it, especially not Final Cut Pro. NVIDIA already has their next GPU technology announced as well: Fermi. The Fermi technology is showing up in a series of Quadro Fermi cards that should push the GPUs even further.
There should be a Fermi card coming to the Mac but as if right now, the Quadro FX 4800 for Mac is one of the fastest GPUs we can get but it should be noted that most applications don’t take advantage of all the 4800 can offer. It’s the high-end 3D applications like Maya or XSI that really use all of its power. While one of several supported cards for the Adobe Mercury Playback engine it’s one of only two cards currently supported as the GPU (DaVinci Resolve pdf link) for DaVinci Resolve for Mac (the NVIDIA GeForce GTX 285 being the other). It’s also one of the supported graphics cards for Autodesk’s Smoke for Mac.
If you get to reading some of the online debate about graphics cards and really dig into the performance numbers you might see that these high end graphics cards are overkill for a lot of what we do in post-production. But the fact is if you want to take full advantage of a certain selection of post applications (Premiere Pro CS5, Resolve for Mac, Smoke for Mac) then the Quadro FX 4800 for Mac might have to be a central part of that system. It might not be the newest of the NVIDIA technology at this point but it is still available out in the distribution channels. Until the new NVIDIA Fermi Quadro for the Mac ships (and it looks like it might in October) and applications support it then the 4800 might be your card.
I’m sure there’s something about all this fast changing GPU technology that I might have missed or misunderstood. My testing might have been unscientific but it’s testing that supports what I have to do on a daily basis. Edit video footage, often with effects and multiple layers and export H.264 files. A search around the ‘net for specs, reviews and performance numbers brings back way more hits that I care to read and understand. I just want the software manufacturers to tell me which card is best for their application and hopefully the moons will align where an editor can have a fast card in their system with many of their goto applications being accelerated by it. The NVIDIA Quadro FX 4800 for Mac is helping allow for some great applications on the Mac that we haven’t seen in post-production before. As technology moves along I hope they just keep on coming!

Filmtools
Filmmakers go-to destination for pre-production, production & post production equipment!
Shop Now