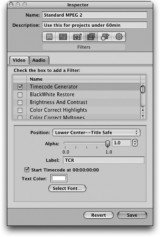
Timecode burn-in is used to assist in referencing back to parts of show. Typically this has been used on VHS tapes for producers so they can comment on shows, etc. These days it’s more common to use QuickTime files and DVDs for this type of work. Since you’re going to have to encode the video anyway (most likely using Compressor), why not add timecode burn-in at the same time?
Fortunately, a great new feature in Compressor 3 allows you to do this.
1 Inside Final Cut Pro select the sequence you want to export.
2 Choose File > Export > Using Compressor.
3 Inside Compressor select the setting you’d like to apply to the file. With the setting active, select the Inspector window and click the Filters tab.
4 Choose Timecode Generator.
5 Change the settings for the Timecode Generator as you see fit.
6 Apply the setting to the clip in the Batch window.
7 Submit the job.
Note: If you’re trying to choose the Timecode Generator for an Apple preset you’ll notice there are no filters in the Filters tab of the Inspector. To be able to add the Timecode Generator to one of the Apple presets, you’ll have to duplicate it first (then it becomes a custom preset).
Like this tip? It comes from the book
Final Cut Studio On the Spot from Focal Press.

