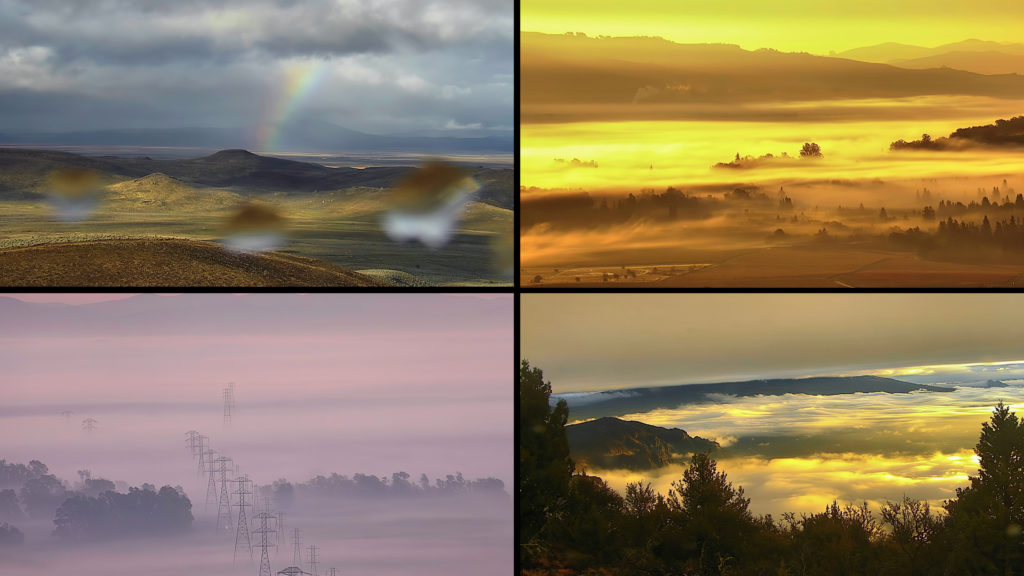
My friend Gary Yost is a filmmaker, photographer, software developer, and lover of the natural world with a very unique blend of artistic and technical talents. His current passion project involves pulling footage from a network of remote cameras and turning it into something quite remarkable. But I’m going to let him explain it in his own words: everything that follows was written by Gary (with some light edits by me, so any typos or grammatical errors are my doing). -Mark
Background
This article describes a technique for creating gorgeous time-lapse videos by using a public networked remote surveillance camera system. Built with tens of millions of dollars in infrastructure, this network was originally developed to assist in firespotting and firefighting efforts.
This artistic usage isn’t the purpose for which the network was intended, but anyone can use it to create beautiful imagery using After Effects, Topaz Video Enhance AI, Davinci Resolve, a couple of AE plugins and a fair amount of computer horsepower. It opens up a new world of nature/climate media content creation that you never have to leave your home or studio to capture.
The ALERTWildfire image data is ephemeral; it’s not stored and if you miss it you’re SOL. So a big part of your success using this process is to develop an understand the meteorology of the various regions of the West – you’ll find that this will bring you into a deeper relationship with nature and place. There’s a feeling of exhilaration… of being “on the hunt” and when I see an interesting weather pattern developing I’ll make a note of it and return to that location a few times over the next half hour or so. The optimal period to capture each shot is 1 hour, so if you wait more than 20-30 minutes you’ve lost the opportunity.
In some ways it’s like having a team of 700 videographers always ready to shoot in the most remote locations, 24 hours a day. In other ways it’s even more intimate because you know that nobody’s there and you’re “lurking” in an uninhabited place.
The ALERT cameras are an infinite source of timelapse material, especially during the winter months when the weather is interesting. Without dynamic weather, the landscapes themselves are just like a blank canvas (to me, anyway). During fire season, the imagery can be truly terrifying, as you can see from my captures of 2021’s conflagrations.
This system started by a group of kids (self-named “Forest Guards”) tackling the problem of climate catastrophe back in 2008. Their idea was to create a network of crowd-sourced fire lookout towers throughout the west so everyone could become fire spotters.
What became the ALERTWildfire system began as a joint project between the Nevada Seismological Laboratory and the Forest Guard team, a group of young students from Meadow Vista in Placer County, California. The Forest Guards won the Innovate Award at the Children’s Climate Action in Copenhagen, Denmark in 2009. Their brilliant idea was to seed the forest with wirelessly connected cameras to enable early wildfire detection. Their most innovative contribution was the added ingredient of using social media and the web to engage the public to stand guard over the forest – to become Forest Guards. Their team leader Heidi Buck and 6 young adults joined together with the seismology lab and Sony Europe to deploy a prototype system in 2010.
By mid 2013, the Nevada Seismological Lab embraced a new generation of IP-capable, near-infrared HD cameras. These cameras were a game-changer, enabling a next-generation approach to early wildfire detection, confirmation and tracking. A mix of private and public funding provided the means to launch ALERT Tahoe and the BLM Wildland Fire Camera program. Recent funding through regional utilities, county-based organizations and CALFIRE enabled the vision set out by the Forest Guard young adults: nearly 1000 cameras in California alone, and eventually thousands in the Western US!
A decade later, the 5th generation of this system has been installed around the west, providing critical information on 1500+ fires in the past five years. The public now has access to this expanding system (www.alertca.live), making their dream of a socially engaged public in the fight against wildfire come true. In Orange County alone, more than 400 citizens have volunteered to watch ALERTWildfire cameras during fire season, especially during red flag days and nights!
Now the ALERTWildfire has become a consortium of The University of Nevada, Reno, University of California San Diego, and the University of Oregon providing fire cameras and tools to help firefighters and first responders:
- Discover, locate, and confirm fire ignition.
- Quickly scale fire resources up or down.
- Monitor fire behavior during containment.
- Help evacuations through enhanced situational awareness.
- Observe contained fires for flare-ups.
You can watch a great documentary about the original Forest Guards, directed by John Keitel & Stephen Kijak : “The Forest Guards”
A few of the many articles about the history of the program:
“Children’s forest fire detection system deployed by Sony Europe”
“First LEGO League: What happens to those great project ideas?”
“Bushfire Live: Origins of the Service”
“AlertWildfire mountaintop camera network tracked 240 western wildfires in 2017”
Although the ALERTWildfire network’s primary purpose is to enable a new form of citizen science so we can all contribute to the safety of our forests and our atmosphere, it can also be used for other purposes and I’m using it to showcase California’s natural beauty – to inspire people to contribute their time on the system during wildfire season, watching for fires.
My own background as a fire watcher goes back to the same year when the Forest Guards came up with their concept, in 2008. That was the year I became a fire lookout on Mt. Tamalpais, overlooking Marin County just north of the Golden Gate Bridge. My film “A Day in the Life of a Fire Lookout” became a Vimeo Staff pick and launched me as a filmmaker. After five years of active duty on Mt. Tam I became too busy to pull shifts but missed the solitude and the beautiful skies which I’d spent all day and night appreciating (and capturing with time-lapse).
In 2016 I discovered the ALERTWildfire network of cameras and began spending my mornings with a cup of tea browsing through images of beautiful locations in California, always keeping an eye out for the telltale sign of a smoke start. The ALERT network implemented a rudimentary timelapse feature that allowed for looking back over the previous 12 hours to get a sense of the smoke dynamics and ignition time. Once the fire season would end in late autumn there wasn’t anything for me to do on the system but appreciate the beautiful winter skies.
There were uncountable times I wanted to share the beauty of what I was seeing with my friends but there’s no function to save the image stream. My friend Andy Murdock recommended I try using OBS to capture the screen output…perfect! My 2019 Mac Pro with 16 processors and dual Radeon cards is plenty powerful enough to run OBS, but the bigger challenge was that the Alert system’s sequential video images are not pushed out via a real-time codec…they’re literally individual low-res, highly-compressed jpegs that are sent down the wire from AWS. There are tons of duplicate frames in the stream with random frequency and duration, making it impossible to work with them further in post.
The Process
Here is the workflow I developed to capture, convert to a clean codec, noise reduce, detail enhance, motion smooth/blur, deflicker, uprez and edit these streams. Note that none of this would be necessary if we could actually pull real video off the system, but ALERTWildfire wasn’t built for that… it provides just enough time lapse imagery so a fire spotter can see how a smoke (or fire) develops over time. So it requires a bit of patience just like in the old days when we used darkrooms and many chemical steps to develop film… this is the super nerdy modern-day equivalent.
This video provides an example of some of the most important steps. The first sequence is the tediously long, randomly stuttering footage that comes straight out of OBS (with the partner logo cropped out)… you’ll see how choppy it is. The second sequence is the duplicate frames pruned by Duplicate Frame Remover in After Effects; the third is after two passes in Topaz Video Enhance AI: Artemis and Chronos Fast; and fourth is with a LUT added for contrast/color along with final output sharpening.
Step 1: Capture
There are many ways to do screen capture but I use Open Broadcaster Software (OBS) to scrape the data off the ALERTWildfire network because it provides for discreet capture of one particular browser window as a background process instead of a standard screen capture tool, which would monopolize my system.
Run the sequence once through in the OBS browser before capturing to cache it as best as possible… Caching is important because you’ll notice that the first time you run it, the timeline sometimes jumps around and even goes backwards. After running it through once, I start playback ASAP after clicking on the Record Screen button in OBS to create a sequence with the shortest possible heads/tails. There will be duplicate frames and a few short pauses of 5-6 frames each but you’ll deal with these in Step 3.
Step 2: Trimming
Bring the captured files into your NLE (I’m using Final Cut Pro), crop them (I remove the sponsor logo but leave in the important status line at the bottom which shows the camera location, date and time). Trim the heads and tails to get rid of the OBS static frames, save as 30fps, 1920×1080 Prores Proxy or LT into a /4Pruning folder.

Left side as-captured from OBS – Right side cropped to remove sponsor logo, status line retained.
Step 3: Pruning – Removing Duplicate Frames
It’s essential to remove all duplicate frames so the next steps in Flicker Free and Topaz Video Enhance AI can function correctly. There are random numbers of duplicate frames so simply changing the frame rate in AE won’t work.
There are two ways to do this… manually in the NLE or with a plugin to AE called Duplicate Frame Remover by Lloyd Alvarez, available on aescripts. When DFR works it’s great but you can’t count on it, especially for the less contrasty scenes (that also can be the most beautiful due to their subtlety). DFR is simple to use; import all the /4Pruning files into Adobe After Effects, making individual comps for each of them using the select all/make comp function and then manually running DFR by selecting it from the Window menu. These need to be run manually due to not having batch capability for this plugin.
I always leave the DFR settings at default because I haven’t been able to get better results with either the Threshold or Area of Interest function, and even at that it’s not a very reliable solution, hence the manual technique.
Because in many cases DFR doesn’t see subtle contrast changes from frame-to-frame correctly, you’ll see that it frequently produces an undesirably short and choppy result. So I’ve mostly given up on the DFR technique and handle this manually by starting with the pruned file in the NLE, speed up the sequence 300-400% (which gets rid of the “on2s, on3s and if necessary the on4s”) and then I look for the small number of duplicate frames that remain (identified by short pauses) and blade those out. This doesn’t take very long, gives you the ability to process any scene no matter how subtle, and provides a stutter-free result that (if needed) you can further smooth in Step 6.
Save all the clips to a /Pruned folder.
Step 4: Deflicker
Many shots will have noticeable flicker due to the constantly varying aperture of the surveillance cams. I use Digital Anarchy’s Flicker Free plugin inside of After Effects with the below settings and it does a great job of deflickering the output. Bring all of the /Pruned files into AE, add Flicker Free to them and render them out to an /FF folder.
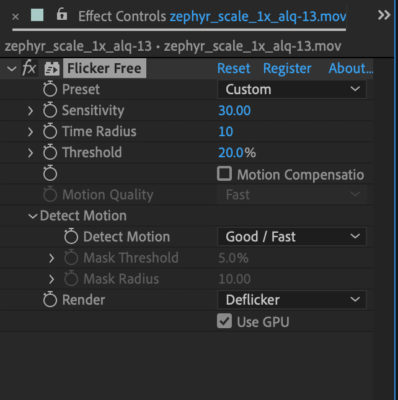
Flicker-Free Default Timelapse settings with Time Radius set to 10 frames.
Step 5: Noise reduction / Detail enhancement
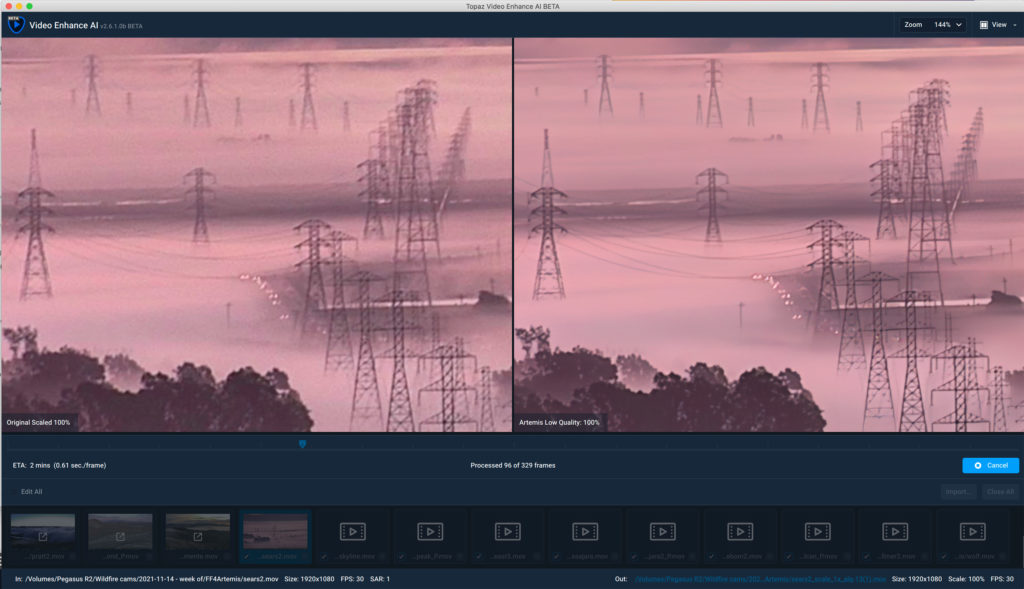
Next, import all the /FF files into Topaz VEAI for noise reduction and detail enhancement. I usually use the Artemis Low/Blurry setting with no grain because it retains the most detail and it does a great job with noise reduction. I output to the same HD resolution because scaling up, even though it would generate a bit more detail, would be brutal at the next (motion interpolation) phase and we’ll scale the final edited video up to UHD at the very end of the process. Artemis uses both GPUs in my Mac Pro and this phase goes quite quickly. Save these to an /Artemis folder.
Before and after Artemis noise reduction and detail enhancement in Topaz Video Enhance AI (click image for full size version)
Step 6: Motion interpolation/smoothing
Import all of the /Artemis files into VEAI and use the Chronos/Fast function to smooth the cloud motion. I typically slow them down by expanding to 1.5-2.0x length and interpolate further by transcoding to 60fps. VEAI/Chronos provides a better result than either Premiere or Final Cut Pro can using their optical flow algorithms. This will use all available processors and takes anywhere from 30-60min per sequence on my 3.2 GHz 16-Core Xeon Mac Pro. Save these to a /Chronos folder.
If any additional retiming causes optical flow errors I’ll use a frame-blended sequence for those bits and transition in and out of that during the portions that exhibit the errors, thereby eliminating them.
Step 7: Prep for Color and Motion Blur in DaVinci Resolve
Bring the fully-processed Prores files from the /Chronos folder into the NLE and check everything one last time for any duplicate frame stragglers, or for discontinuous exposure changes that you need to fix with blading and cross-dissolves. Save these to a /4Color folder.

Step 8: DaVinci Resolve for Motion Blur and Color
Import the /4Color files into Davinci Resolve on a 30fps timeline, which will make sure that your 60fps overcranked clips generated by Topaz come in correctly at half speed. Any shots that were made of Compound Clips in FCPX will need to be re-compounded in Resolve’s edit page, and once that’s done the entire timeline of imported shots need to be selected in the Edit page and then flattened using the Render In Place command to create new Prores files that can be processed with Motion Blur in the Color page.
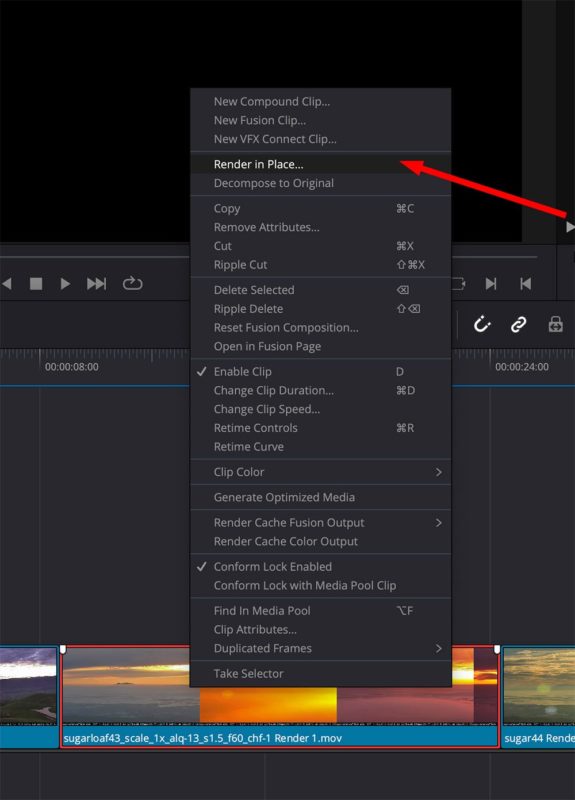
From Resolve’s Color page you can optimize the contrast, add any secondary qualifiers to isolate elements for local tweaking and then apply Motion Blur to the clouds (a critical step since the ALERTWildfire cameras use a high-speed shutter with no blur in them). This phase is incredibly fun because you can perfectly hand-craft each shot to create the optimal creamy result.
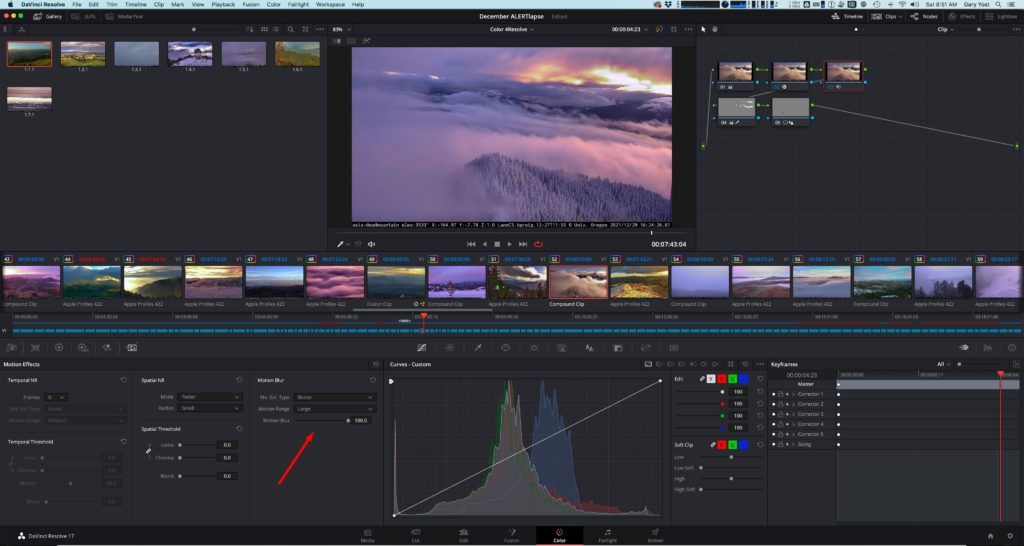

Before and after with 50% motion blur

Before and after with 100% motion blur
Step 9: Uprezzing to UHD/4k
Once I’ve locked the final edit to music I export a version in Prores422 and send that to Topaz VEAI for the final stage… using the Proteus AI model to:
- Enhance the resolution from HD to UHD
- Dehalo the hard, dark line that outlines many of the ridges against the clouds. This is an artifact of the very high compression that the cameras send to the servers and the only way to deal with it is at this stage.
- Generally make the entire piece look more “filmic” by reducing areas of high local contrast and “crunchiness.”

And then finally, I add a slight bit of sharpening back in the NLE and… voila! The piece is finished. (whew)
Ironically this workflow to capture beauty uses the same set of cameras that focus on tracking our most nightmarish disasters with the hope of avoiding and mitigating them. I see what how I’m using the same cameras to capture this beauty as the Yang to the ALERTWildfire project’s Yin. My hope in generating this imagery is to make it part of a larger project to help raise awareness of the system in advance of the 2022 fire season and enlist many thousands more fire spotters once they see these intimate views of all the beautiful spaces we have here in California to protect.
We can all raise awareness of the ALERTWildfire network, and how it’s not just useful for spotting wildfires but also an instantly accessible way of experiencing the beauty of our natural world here in the West.
Gary Yost is an American filmmaker and software designer, best known for leading the team that created Autodesk 3ds Max, the world’s most popular 3D visual effects production system. He is an award-winning filmmaker with unique expertise in the combined fields of computer imaging, filmmaking and immersive storytelling. His 2021 Emmy-nominated VR film “Inside COVID19” was created by the nonprofit he founded in 2018, to create immersive experiences of shared wisdom. www.wisdomvr.org

Filmtools
Filmmakers go-to destination for pre-production, production & post production equipment!
Shop Now