A few months ago I started to get into Unreal Engine as, to be honest, it has been my easiest road to 3D animation that I’ve ever come across. The Unreal Marketplace has been a Godsend, as it’s taken the pressure off me to learn actual modeling (which I suck at). I just want to be able to create scenes as quickly and easily as possible with as short of a learning curve as necessary. I was working on an animation, where I had purchased a cheap FBX model that needed altering done to it (normals were inverted in half the model, but we’ll get to that later). I’m not about to start paying for a 3D application to do a minor adjustment. That’s where I came across Blender. No secret that Blender has been around for a long time now. I immediately thought to myself “OH GOD….A BEAST OF AN APPLICATION THAT I NOW NEED TO LEARN!”. Well, start to learn it, I did. And I discovered another little secret about Blender. It’s a lot more like Unreal Engine than I thought. Let me tell you what I discovered.
BLENDER IS FREE AND OPEN SOURCE
Blender is Open Source. It’s really the community’s baby which, in my opinion, really makes it stand out from all the other 3D applications out there today. You’re probably thinking, well, what difference does that really make. For me, it’s a big one. It encourages the community to come up with better ways of doing things.
THERE’S ALWAYS A BETTER WAY OF DOING SOMETHING
For me, time is always my biggest issue. I want to learn something quick and easy (like baking a cake, lol). For me, there are always a few hurdles in 3D applications. Modeling. Yep, I can’t do that. So, what would be helpful is if there was an add-on, or plug in that would let me just purchase or download what I need, to make the scene I want. Now, with that said, don’t get me wrong. There are a ton of sites out there that let you purchase 3D items like models. Need a building for a scene, go to Turbosquid, or any one of the other sites out there, and just buy it. But, that’s not what I’m talking about here. I’m talking about add-ons/plug-ins like in After Effects. For example, I want to create a mini city. I need buildings where I have four to choose from, but I can take any one of those four, and create four hundred buildings out of them, to quickly and easily create my city. No problem. The Urbaniac add-on does that. Next up. Rendering. Oh God. Rendering. It’s not so much the rendering that I always have an issue with, it’s the previewing that drives me nuts. In render engines, there are always a thousand parameters that you can tweak, to get your renders just the way you want them. And that’s completely understandable, as many of these 3D programs create Hollywood feature films, and It’s no different in Blender. I tried doing a few test renders in Blender and, honestly, it took forever. I really had no idea what the application was doing, and my render looked average at best. Can’t I just have low, medium and high quality to make my life easier, and if I want to go deeper, I can??? Well, there’s an add-on for that as well. K-Cycles is that. Cycles, if you’re unfamiliar with it is Blender’s ray-trace based production render engine which offers
Unidirectional path tracing with multiple importance sampling
- Multi-core CPU rendering with SIMD acceleration
- GPU rendering with:
- NVIDIA: CUDA, OptiX
- AMD: HIP
- Intel: OneAPI
- Apple: Metal
- Multi-GPU support
- Unified rendering kernel for CPU and GPU
I’ll be honest. I’m sure that all of that means a lot to a lot of people. For me, I just need my renders to look as good as possible, and not take a week to finish. K-Cycles makes my rendering and previewing (most importantly) life so much easier, and we’ll talk about it in its own dedicated article. So, let’s talk a little bit about what is powering me to get up to, what I would call, intermediate level in Blender so quickly, and that is the Blender Market.
THE BLENDER MARKET
For me, this was really what sold me on Blender, and even attempting to add another 3D application to the mix. What sold me on Unreal is that the marketplace can get you about 80-90% of the way there, to wherever you need your projects to go, and then basic Unreal knowledge would get you the rest of the way there. The Blender Market is pretty much the same, just for Blender. You can start out with basic elements, and work your way up from there. Need buildings to populate your scene, the Market has it. Need to add rain? Snow? Fog? Need to rig your characters properly? The Market has it all.

It’s divided up into six main categories:
- Modifier Setups
- Models
- Material Shaders & Textures
- Scripts & Add-Ons
- Render Setups
- Training
Each of the Categories has simple to navigate sub-categories to find what you need as quickly as possible. For me, I always like to jump into what’s “popular”, as a way to see if the product is something that I would use and, believe it or not, there is the ability to search by “sales”, which I thought was handy. One thing that I noticed, that I thought was pretty interesting, is that none of the products on the market, even what I would consider to be the “more popular” ones, were not very expensive. Probably one of the best water generation plug-ins that I’ve seen, Flip Fluids, is only $76 US which, for what it can do, is a steal. What also makes these add-ons great is that most of them are a “buy one, have it and all the updates for life”. I’ve seen a few products that have a yearly “maintenance” fee to update, but for the most part, most of the add-ons I’ve used have been “one and done”. Flip Fluids is one of those add-ons. Once you purchase, you get updates for life!
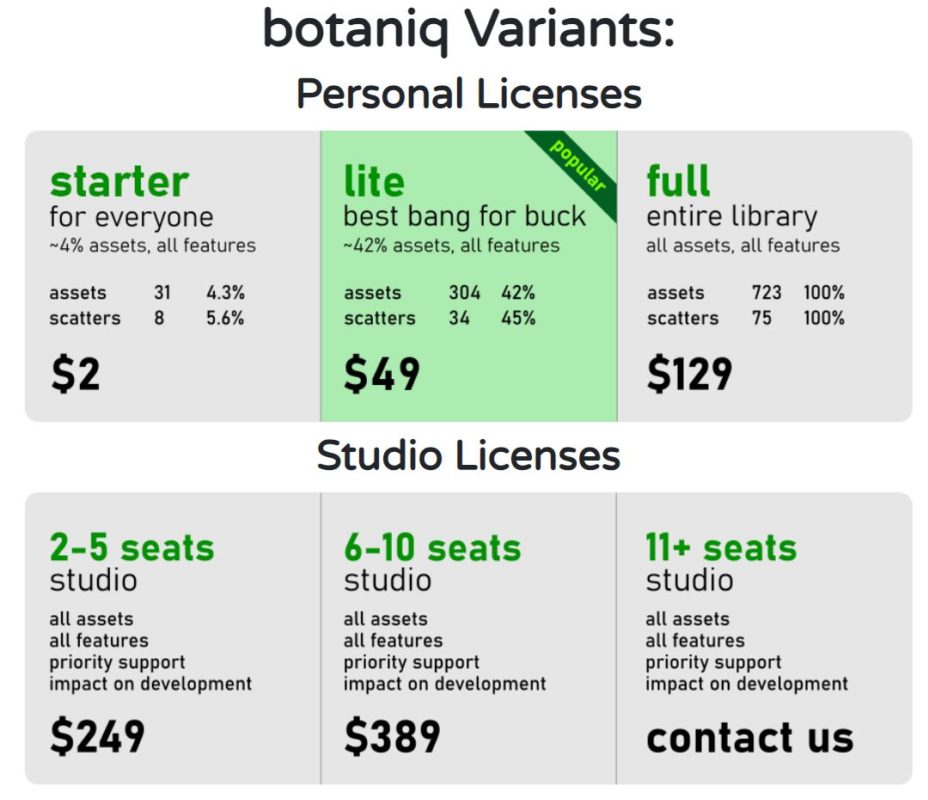
When looking at these add-ons, you might notice that there could be a huge cost difference with some of them, at first glance. Meaning that any of the given add-ons would be $10-$500. Where the differences come into play would be there might be a Lite vs Pro version (10 tree types vs 50 tree types, for example), and then there might be a Hobbyist, Freelance and Studio cost, based on how many people would be using the add-on. Bontaniq by polygoniq is a perfect example of this. Botaniq is a Tree and Grass library that offers a bunch of different purchasing options from “cost effective” (AKA – cheap) to the top top tier – 100% of botaniq + future updates, for studios with 6-10 seats that is $389 USD. Below, you’ll see the difference in the different versions.
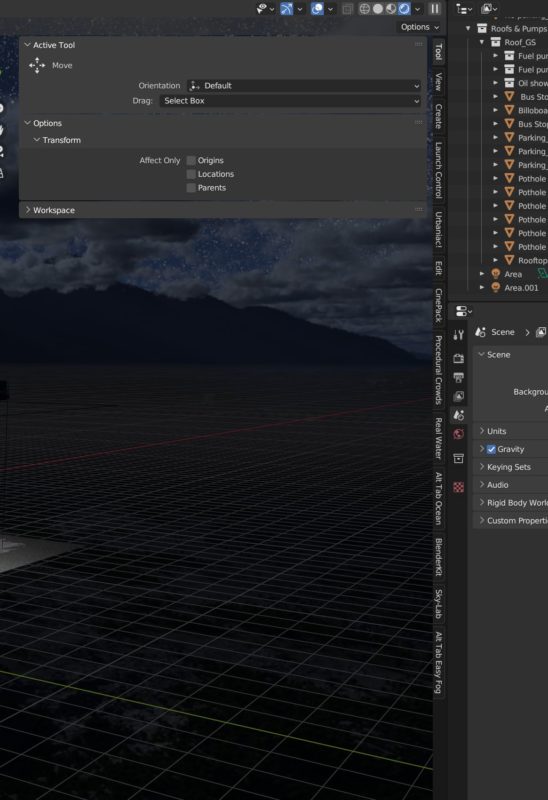
Now, there is something that’s important about the add-ons that I do want to mention here, and that is depending on how many you are working with in any given scene you’re creating, your sidebar can get quite full, so keep that in mind. I try to only open the ones I’m going to be using, so that my bar isn’t full, all the way down the side of my viewer.
I thought I’d throw out a few samples of what I’ve purchased in this article, to give you an idea of cost vs value, when it comes to adding realism to your work with as little of a learning curve as possible..
EasyFog – $8 USD
Probably one of the best cost to value ratio’s right here! $8 USD to quickly and easily make fog in your scene. How simple is it you ask? Simply select all the objects you want to have the fog surround, choose your preset, and once you click it, a transparent box will appear around your elements that will contain the fog.
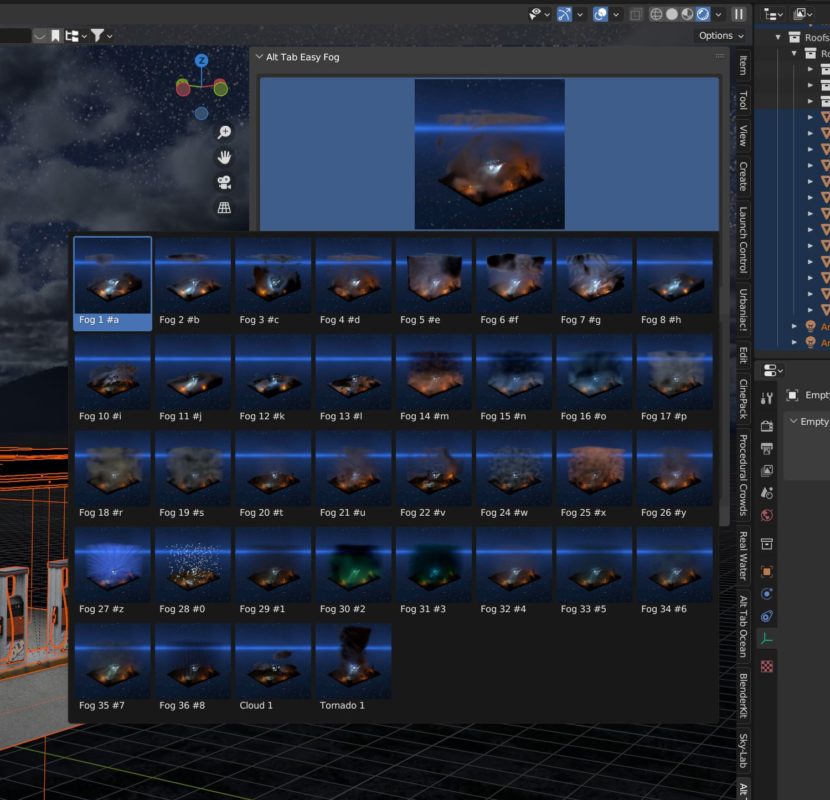
That’s really it. Quick, simple and effective.
BEFORE
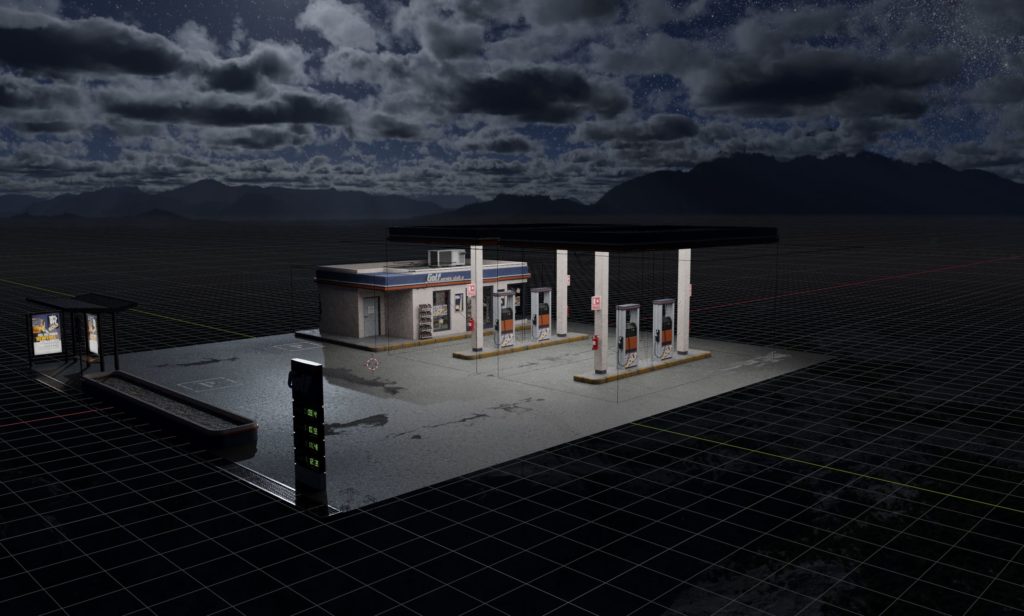
AFTER
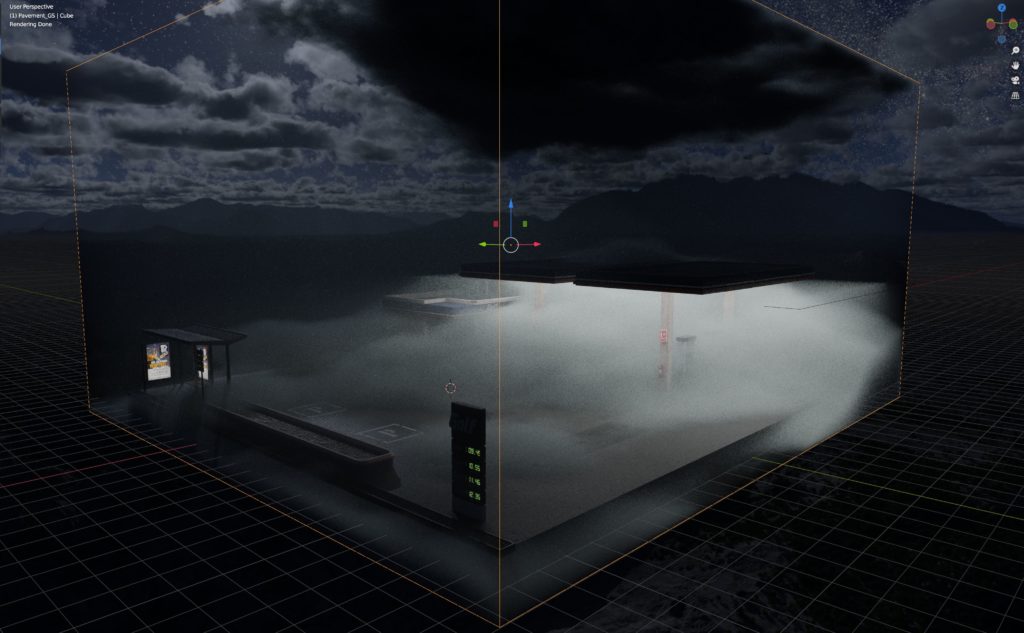
And now with a little bit of animation…..
Not too shabby for $8 USD. Best part is that I didn’t have to create anything!
K-Cycles – $54 USD
As I had mentioned earlier in this article, Cycles is Blender’s physically-based path tracer for production rendering. My issue is that I find render engines to be complicated, confusing, and if not tweaked just right, it can take forever for my renders to finish. In most cases, unless it’s for a client (or a demo reel), I’m only rendering at low resolutions, for my own viewing/posting on social media. K-Cycles has given me an excellent starting point to get great renders, and quick speeds, without having to know how to rewire the warp core on the Enterprise. A few of the features of K-Cycles are:
- Ultimate rendering performance for viewport and final renders.
- Amazing Ultra Lighting the most powerful and complete lighting features for Cycles.
- New Ultra Denoiser with the latest Intel denoiser technology and multi pass for clean and super sharp images.
- Ultra Denoiser works inside Blender without needing the compositor and has great performance avoiding complicated compositor nodes.
- Animation Denoiser uses the latest OptiX temporal denoising to improve animation render times.
- Even faster renders using intelligent scene and settings optimizations preset modes with higher K-Cycles performance while still maintaining good image quality.
- Amazing viewport Ultra Lighting, Post FX including BLOOM effects, FLARES with glare, anamorphic and ghosts, Tone Mapping and Lens effects that elevates your art to the next level.
What makes K-Cycles different from other add-ons, is that it’s not launched from within Blender. It’s actually it’s own launcher that integrates K-Cycles into Blender as the default Cycles render engine, as you can see in the image below.
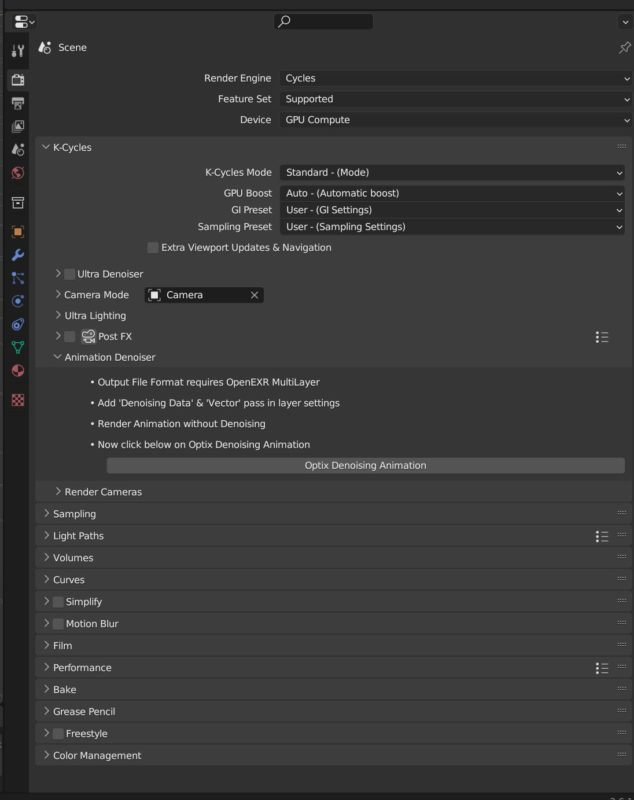
K-Cycles is like a rabbit hole that, at some point, I’ll dive down to get to know all the bits and pieces, but as a starting point, it’s getting my renders exactly where I need them to be.
Launch Control – $49 USD
The reason that I wanted to start learning Unreal Engine and now, I guess, Blender is for getting my renders as photo realistic as possible. The problem with that is that if the elements in your scene don’t move the way they should, it doesn’t matter how real it looks, it just won’t look right. Car driving animations have really caught my eye, and having cars moving as realistically as possible has always been a challenge …until now. Launch Control is an add-on specifically for rigging and animating cars. Doesn’t matter which car you have, classic, vintage, futuristic or even post apocalyptic. Launch Control will have you animating it not only with ease, but super realistic in a matter of minutes. This add-on will get it’s own dedicated article, but for now, here’s a sneak peak at an animation I created using it.
Procedural Crowds – $18 USD
You’ll always need people. People to populate your city streets, people to cheer in your ancient coliseums, people to line up for helicopter fly over shots. That’s where Procedural Crowds comes into play. Whether you’re using their library of included pedestrians, or you use your own models, depending on what you need them to look like (You might need villagers, Roman Centurions, or even Cyberpunk thugs), you can easily add your own. In my Launch Control sample animation you see above, the pedestrians were created using Procedural Crowds.
With three clicks of the mouse, I created the animation you see below. Now, keep in mind that in my below animation, if you look very closely, you might see a couple of people in there that look doubled up, but if you tweak the crowd and your animations slightly, you can easily create huge mobs of people, doing exactly what you need them to do!
Urbaniac Pro – $55 USD
You’ll notice a little trend here. We have the cars, we have the people, and all we need is the city to go with them. That’s where Urbaniac Pro comes into play. With more than 180+ City assets including buildings, roads, sidewalks, highways, signs, gas stations, signs and so much more. You’ve actually already seen elements of Urbaniac in this article from the gas station in the fog, to the city streets in the Launch Control section. If you’re looking to build a great looking city, Urbaniac and it’s extensions (roads and buildings), will be your “go to” to create your next Metropolis.
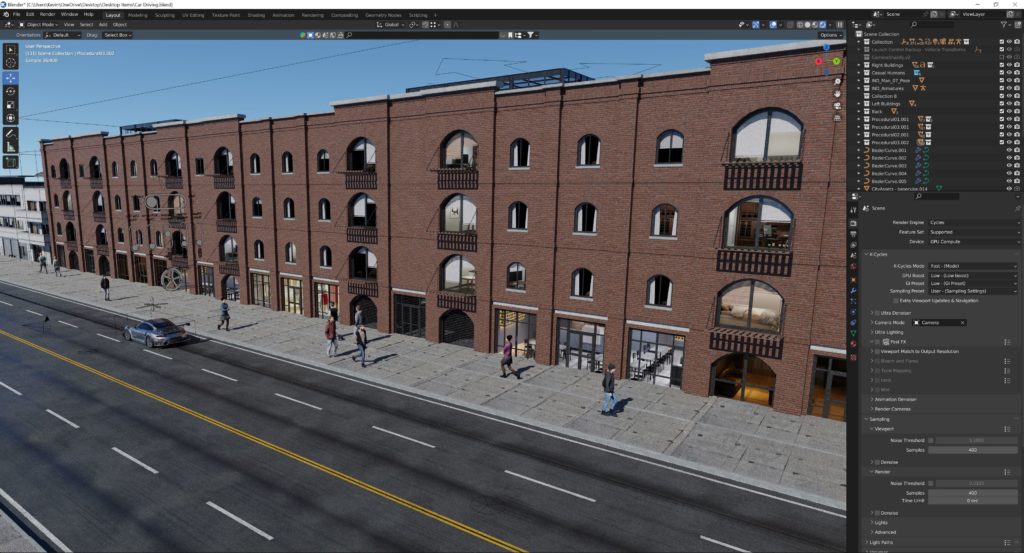
Now, with all of this said, how does it tie in with Unreal Engine? Well, there have been countless times where I need to get in and alter an FBX model. I’m not paying for a 3D application. No problem. Blender is there to help. I can build animations in Blender, and then export them and import them into Unreal Engine. Maybe I need to set up a car animation that just doesn’t work in Unreal Engine. No problem. That’s what Blender is for. As I’ve started working through Unreal, and now Blender, I see more and more how the two of them go hand in hand together and when I’m creating each and every new Unreal project, I know that I’ll spend a good amount of time in Blender, tweaking my elements or my animations, so they’re perfect for Unreal Engine 5. To download Blender for free, you can head over to the Blender Project at www.blender.org . For more information about Unreal Engine, you can install it from the Epic Launcher.

Filmtools
Filmmakers go-to destination for pre-production, production & post production equipment!
Shop Now