Like urban legends, there are a few pieces of “conventional wisdom” that float around the motion graphics and 3D communities about how to handle video. They are oft-repeated, but several are simply not true. Some are based on wishful thinking; some on a germ of truth; some from articles or manuals which are incorrect. Yes, you probably already know all of these – but they certainly have caught out colleagues of ours.
Not surprisingly, many of these legends are based around the subject of frame rates and interlaced fields. Fields in particular are an area where traditional video diverges perhaps the most from the computers we’re creating our video on, and for that reason are easiest to misunderstand.
Legend #1: Field Order and Field Dominance are the same thing
To this day, a large number of software manuals and dialog boxes refer to the “field dominance” of footage that has either been captured into the computer or which you’re about to render. But the concept of field dominance does not exist inside the computer; what they probably mean is field order. This is not just a simple naming mistake – there are times when the two can be at odds with each other.
First, a refresher course on what fields are. A video frame is not drawn on the screen from top to bottom. Legend has it that early television displays had a problem where the phosphors in the screen could not hold their luminance long enough. This meant that by the time the video raster was drawing the bottom of the image, the top was already fading. When the raster went back to the top to draw the next frame, the sudden change in brightness was noticeable.
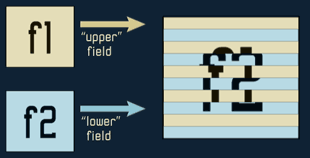
The workaround that was to skip every other line as the image was drawn, reaching the bottom twice as fast. This meant the raster could get back to the top of the screen in half the time, where it could then go about drawing the lines it had to skip the first time through. The result was better averaging of the overall luminance on the screen, resulting in less noticeable flicker.

When video is recorded to tape, it is not recorded a whole frame at a time. One field is recorded, and then the other follows it later. This fits in with the order that they get drawn on screen. Indeed, when interlaced video is captured by a camera, it actually captures each field a half of a frame later in time than the field before. Understanding that these two fields represent different points in time is pivotal to understanding fields and interlaced video.
If all you have on tape is a stream of fields, which two make up a frame? The video signal actually has a signature in it that unambiguously labels fields as being either “field 1” or “field 2”. The term Field Dominance refers to where you decide a frame starts – before field 1 (resulting in Field 1 Dominant), or before field 2 (resulting in Field 2 Dominant). This is especially important when you edit two different video streams together, as you can’t have two of the same types of fields appear back to back before you draw one of the others. A large number of systems – including all computer editing systems I’m familiar with – are Field 1 Dominant. But this is not a rule, and some editing systems even allow you to switch their dominance.
Fields Dominance describes where in the field order on videotape an editing system places its cuts. In this example, cutting before Field 1 would make it Field 1 Dominant. This is not necessarily the same thing as field order inside a computer.
Back to the computer. When video has been digitized, most applications present it to you a frame at a time. But those frames actually contain two interlaced fields. To process these correctly, you ideally want to separate them back out into individual fields. And to do that correctly, you need to know which field – the one that begins on the first line, or the one that begins on the line after that – came first in time. This has nothing to do with how you edited the video, or the electrical signals that numbered the fields on tape; it has to do with how those two fields were stored in a single frame on your disk drive.
How do we refer to this temporal field order inside a frame? Some use the term odd or even field first, based on one field starting at the first line and filling in the odd-numbered lines, and the other field starting on the second – or even-numbered – line. But unfortunately, not everyone calls that first line “one” (an odd number): Some refer to it as “zero” (an even number). Thus, the same file could be referred to in one program as even field first, and in another program as odd field first – and both mean the same thing. A better term to use is upper (the first line) and lower (the line below the first line).
Here’s where the confusion comes in: Most professional NTSC video systems write frames that are lower field first, meaning the first field in time is the one that starts on the second line from the top of the frame. They also captured that video off of tape first field dominant – in other words, “field 1” on the tape starts on the second line in the file, which would appear to be a contradiction (until you realize the two terms have nothing to do with each other).
This language barrier between the field order computer people are interested in, and the field dominance hardware people are interested in, has botched the final delivery of a project more than once. Also consider that some computer systems are indeed upper field first, and that some non-computer editing systems can be switched to second field dominant, and you can see just how much hair can be pulled out of one’s head on deadline – there’s almost no hope you can have a meaningful conversation on the subject with a post house engineer who’s not familiar with creating video on personal computers.
The short answer is: If you’re on a computer, you care about field order, not field dominance. When many say field dominance, they really mean field order. If they actually knew what they were talking about when they told you the field dominance of their system (such as a post house engineer), they’re telling you information you don’t need to know once you’re in the computer environment – your focus is on the field order inside a frame. And if you run across a manual or dialog box for a piece of software that uses the term “field dominance”, set the manufacturer straight, before they cause some real damage.
(In the rare cases where you need to reverse the field dominance of a videotape, see the sidebar on the last page of this article.)
Legend #2: You can add fields later
This one pops up on discussion lists every few months, and usually from a 3D user: “If I didn’t field-render my 3D animation, can I add fields later by field-rendering it out of After Effects?” You can understand the desire for this to be true – 3D renders usually take a long time, and field-rendering usually takes twice as long. But as the song goes, you can’t get something for nothing…
As we’ve noted above, each field in an interlaced video frame actually represents two different instances in time. This is one of the visual characteristics of video: smooth motion, because that motion is actually being sampled at twice the frame rate, and then interlaced into a single frame. Programs like After Effects are then able to extract these individual fields and treat them separately when it field-renders them back out again.
What happens if you bring a frame-rendered file into After Effects, and then field-render the output? Less than you might hope. When After Effects renders the first field of a frame it is outputting, it will look at a frame of your 3D render. And when it goes to render the next field, it will look at that same exact frame – even if you tried to separate the non-existent fields of the source movie.
There are a couple of ways you can indeed create different visual information for those fields. One trick some try to use is to enable Frame Blending in After Effects. When this feature is enabled, After Effects will create a crossfade between adjacent frames if a unique frame (or field) is not available. However, this does not create new motion; it just creates echoes of the image. This helps a little if your frame rate is slower than normal video, or if you are time stretching the source, but is not really a satisfactory solution to the field rendering issue.
A better solution is to use software or a plug-in which performs motion interpolation, creating new pixel locations for in-between moments in time. This software studies the patterns of the pixels from frame to frame, looking for similar groups, and the tries to figure out the path along which they moved between frames of the source material. We personally use RE:Vision’s ReelSmart Twixtor plug-in for After Effects. Twixtor gives a few different parameters you can adjust to help it track different types of source material. As you would expect, better tracking usually takes longer to render. But it’s usually faster than a 3D render, and might help you out of bind when the only options are either strobing motion, or a very long re-render. A comparison between different techniques is illustrated below:
Above are side-by-side comparisons of no frame blending (upper left), the default frame blending Frame Mix mode (upper right), Pixel Motion mode (lower left), and RE:Vision Effects’ Twixtor (lower right). Look at the forearm on right to see the differences; notice the wrinkles between the arm and body in the Pixel Motion example in the lower left.
(Update Note: After Effects version 7 and later has added Pixel Motion and Timewarp to supplement its built-in Frame Blending. Like Twixtor, they create new intermediate frames, and are based on The Foundry’s Kronus technology from their Furnace plug-in set. We personally prefer Twixtor over Pixel Motion and Timewarp, but you may want to try these alternatives first as they are included free with After Effects 7 and later.)
Keep in mind that your renders don’t have to be field-rendered to work with video. Many render their 3D animations at 24 fps (the common film rate), and let their video applications add the equivalent of 3:2 pulldown to make the frame rates match. Rendering whole frames at 29.97 (NTSC) or 25 (PAL) frames per second is a perfectly acceptable compromise. I would just personally make sure I included a bit of motion blur in the render (or added it later with RE:Vision Effects’ ReelSmart Motion Blur plug-in for After Effects), to help cover any strobing that might result from not capturing the motion in your animation at every field.
Legend #3: Drop Frame footage runs at a different speed than Non-Drop
Black and white video originally ran at 30 frames per second in the US. When color was introduced, there was concern with potential signal interference issues, so the frame rate was slowed down by 0.1% to approximately 29.97 fps. This speed change adds up to about two fewer frames of video being played per minute. Over the course of one hour, video time is now 3.6 seconds behind real time – just enough to chop off your production company’s logo at the end of that one hour drama you produced for television…
This slowdown also threw off the timecode used to tell how far you were into a tape or a program – the effect was like a clock running slightly slow. The longer the tape or program, the more noticeable this difference becomes. To compensate for this, a timecode counting method called drop frame was invented. Drop frame counting skips certain frame numbers – namely, two every minute, except for the “tens” of minutes (00, 10, etc.) – to get the video clock close again. An example of this is shown in the table below:
Unfortunately, many people incorrectly assume from the name “Drop Frame” that actual video frames get dropped (they don’t), or that a non-drop counting method implies the original speed of 30 fps (it doesn’t). These misconceptions are most common in audio software, some of which even used to skip audio samples when drop frame timecode was in use, potentially adding clicks to the soundtrack at this points.
The reality is that NTSC color video runs at 29.97 fps, regardless of the method you choose to use to number those frames. The only thing that should be dropped are the numbers used to label those frames, not any actual content itself.
Since drop frame math can be confusing, it is common to use non-drop timecode for 29.97 fps work under a half hour in length. Drop frame timecode is usually displayed slightly different inside software or on the timecode readout on a tape deck: The normal colons (:) between numbers are usually replaced with semicolons or simple periods. Some video software (such as After Effects) defaults to drop frame counting when you initialize their preferences; keep an eye out for it and set it to non-drop if you tend to work on shorter pieces. Note that most DV tapes (and therefore, editing timelines) also default to drop frame. And be particularly aware of using audio software in drop frame mode, as some applications actually dropped “frames” (and therefore, skip bits of audio) – try to work in non-drop, and adjust for the numbering difference later.
Reality
It is not reasonable to expect every artist who creates video content to be born knowing the intricacies of the technical side of video. But unfortunately, you’ll have to learn them sooner or later: Especially when other users – or even the manuals to your software or hardware – may be giving you bad advice. Hopefully this article has helped to demystify and set the record straight on some of the more common pieces of bad advice and “urban legends” floating around out there. The result will be less time wasted re-working a video output that’s wrong.
Special thanks to Don Nelson of Avid’s Advanced Technology unit for additional information on the field dominance issue.
sidebar: Reversing Field Dominance
As mentioned in this article, some editing systems are Field 1 Dominant – they make their cuts before “field 1” on a videotape – while others are Field 2 Dominant, making their cuts before field 2. Occasionally, a tape cut on a Field 2 Dominant system is later transferred to, edited on, or digitized by a Field 1 Dominant system.
The result of this is can be that the way frames are formed has been offset in time by one field. Cuts now straddle frames: a single frame will contain one field of the prior scene, and one field of the next scene. Another problem occurs if you shot the video in progressive scan mode, meaning each frame should not be interlaced – but now the captured footage seems to be interlaced on every frame. This is because it has been shifted in time by one half-frame (field), resulting in each original frame now being split across two frames.
It is possible to unwind this problem and get back to the original, correct, whole frames. We personally use After Effects for this job.
Import your footage, and make sure you separate fields correctly for your footage (usually lower field first for D1 or DV NTSC). Next, create a composition at twice the frame rate of the footage (i.e. 59.94 fps for NTSC) – this will give you an increment in your timeline for every field, not just every frame. Drag your clip into this composition, and then slide it along the timeline to start just one increment of time (i.e. field) later. This un-does the slip in time that occurred between editing systems, placing the correct fields back together into the same frame.
The downside of this move is that when After Effects goes to render the lower field of the new frame, it is actually using an interpolated version of the upper field of the previous original frame. To correct this, move your footage up or down in the composition by a single pixel. By doing so, you are offsetting the fields to end back up on their original lines, albeit in a new frame. Render as you would normally: 29.97 fps, with the same field order as the source footage. If you like, trim your render to skip the first frame; unless you started somewhere other than the start of the clip, your first frame will have a field missing as a result of your offset.
The resulting movie will now have its edits happen on whole frames, and any progressive scan footage will have its whole frames put back together. It will also be shifted up or down a pixel, but since this is buried beyond the Action Safe area of the frame – you won’t see it.
The content contained in our books, videos, blogs, and articles for other sites are all copyright Crish Design, except where otherwise attributed.


