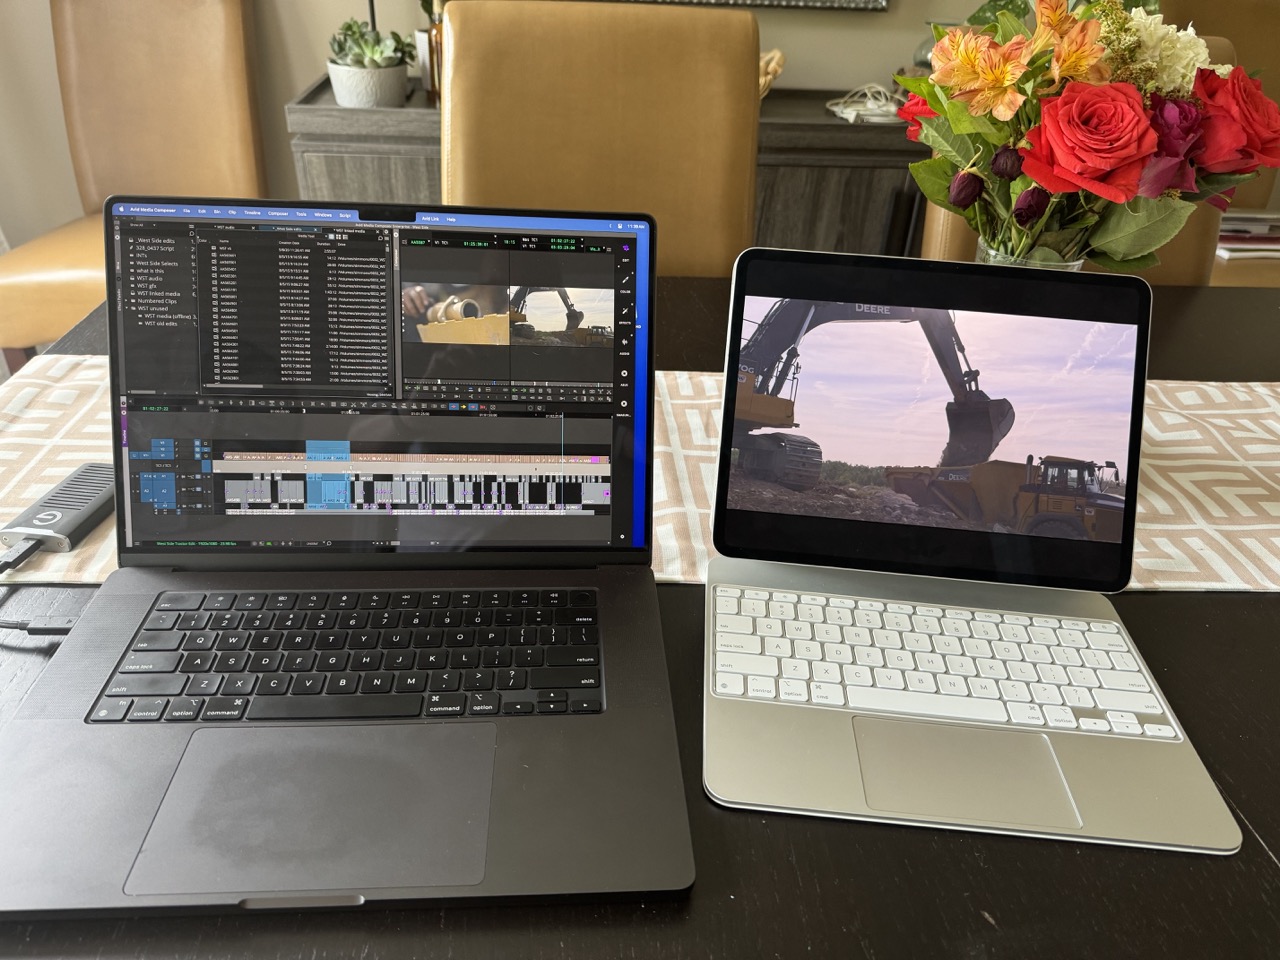
After I posted part 1 of my M4 iPad Pro review, I had several messages asking how to use an iPad as a full-screen monitor during video editing. It is quite easy; you just have to know if your desktop non-linear editing application supports full-screen playback of a connected display. And then how to turn it on and off.
And I’m talking about using a connected computer display, usually via Thunderbolt or HDMI, right out of the computer and not buying a piece of video hardware such as a Blackmagic UltraStudio or AJA IO device. Those types of products, taking the video signal from your editing application and then sending it via a professional connection to a higher-end monitor, are the standard for client viewing in an edit suite. While a connected computer monitor can provide a great full-screen display for editorial, it’s not what I would rely on for broadcast accuracy and color correction.
But when you’re in a pinch or traveling as light as possible, an iPad can provide a very nice full-screen display for video editing. And then you can use it for all the other iPad things when you’re not editing with it.
Note, this is not a hardware-based HDMI solution we’re talking about here
There are tools that let you connect a video signal to an iPad via a piece of hardware. Apps like Orion and Video Assist can use a USB-C capture device and a video signal and use the iPad as a field monitor. That can be a great workflow and could conceivably work with an editing system as well but if you’re working in an all Apple workflow you don’t need that since Apple has all the tools built-in to use your iPad as a full-screen editing monitor.
What you’re basically doing is taking the signal from editing the application’s Viewer, Canvas, Source, Program, timeline (whatever it’s called in your application of choice) and sending that to an iPad, which the app sees as a connected display. This is possible using Apple’s Continuity feature between Mac OS and iOS. Any iPad that can support the Sidecar feature of Continuity can be used as a full-screen display. I’ve used this on three different iPads, from an original iPad Pro up to the new M4 iPad Pros.

And even wireless?
It’s easy to connect an iPad to a Mac using a Thunderbolt or USB-C cable. And if you’re working long days with an iPad as a full-screen display, you’ll probably want it hard-wired to keep the battery charged. But this can work wirelessly as well.
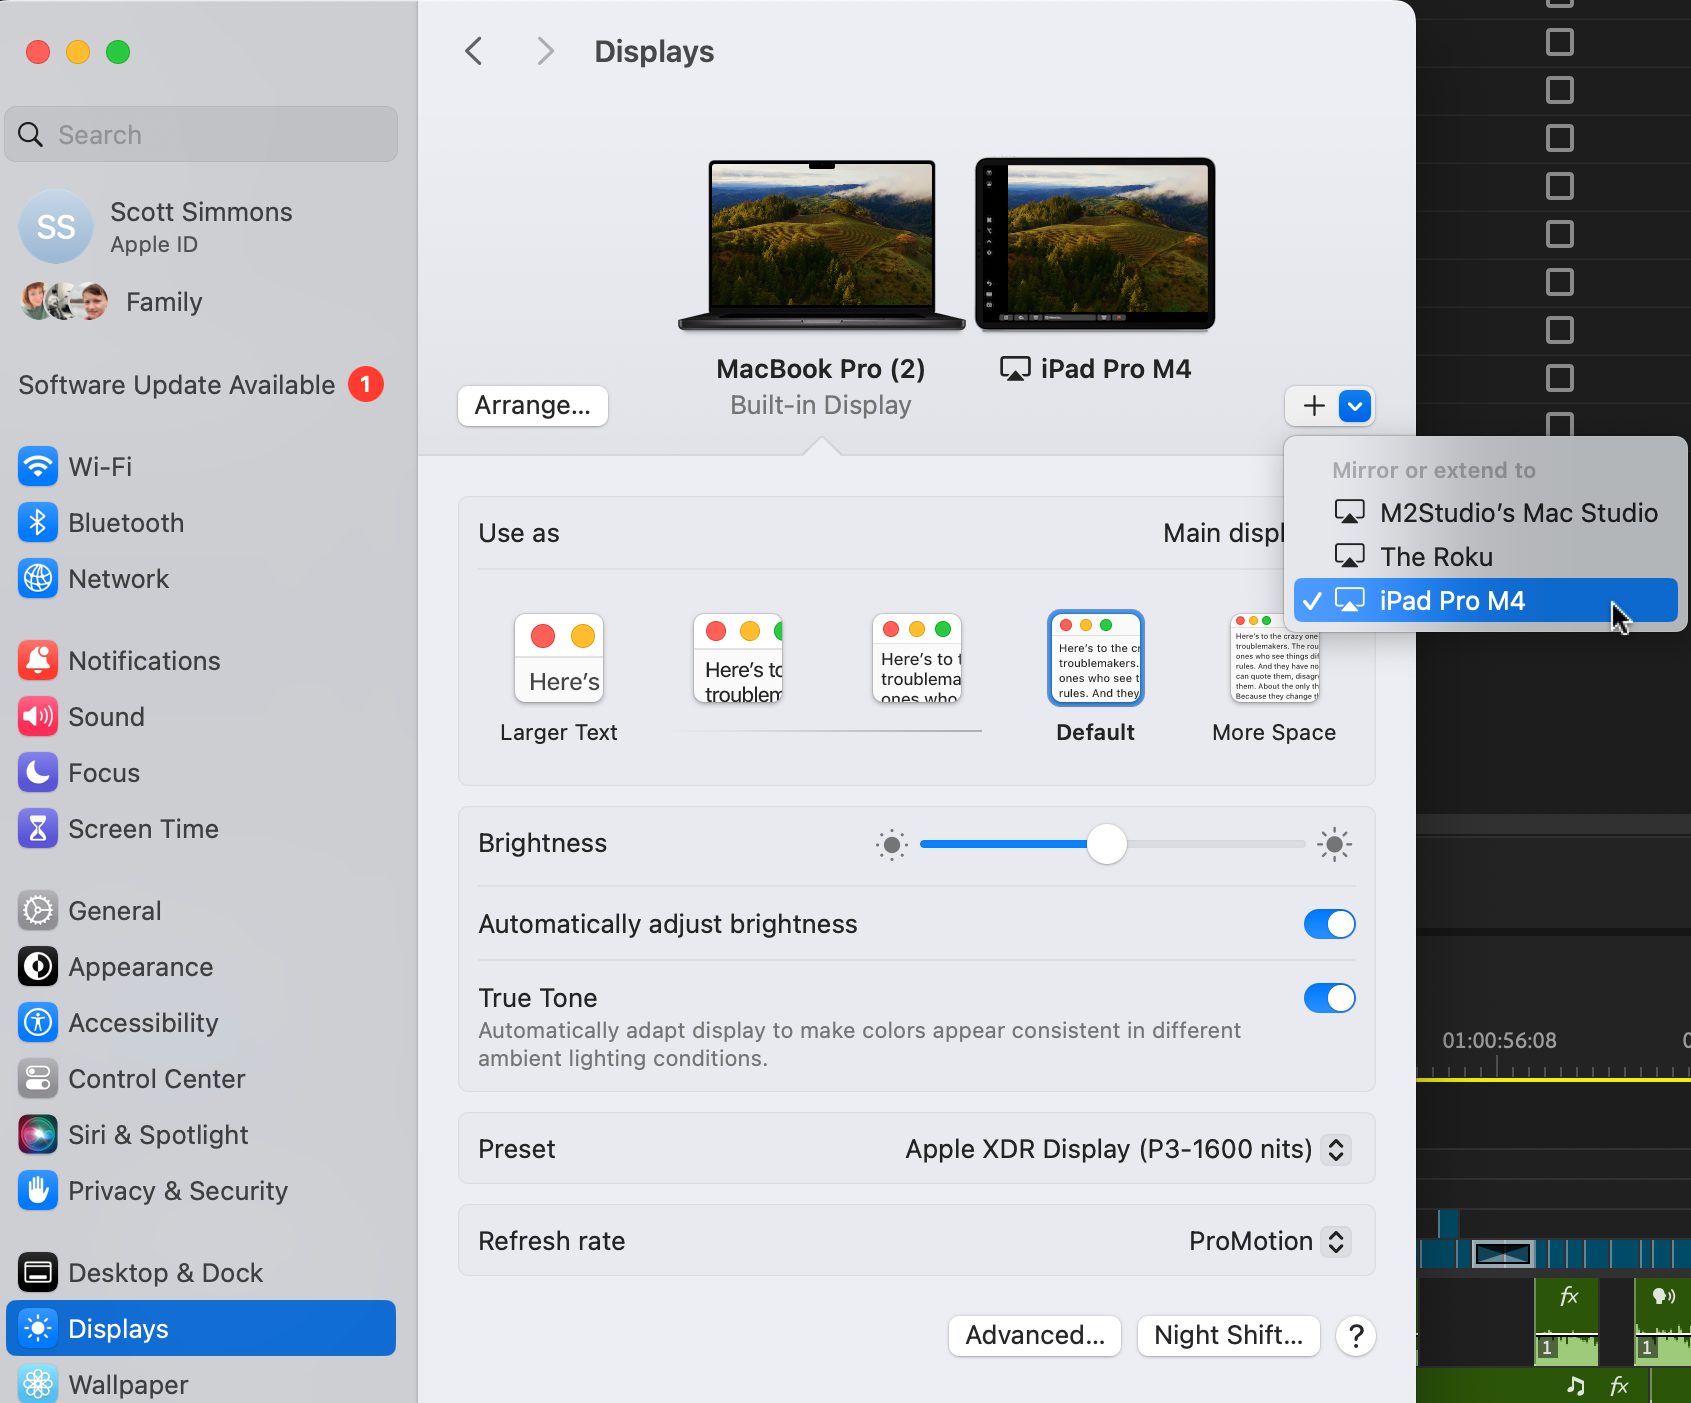
The key to this fast and easy display is Apple’s Sidecar technology. With your iPad on and ready to go, head to Settings > Display and connect the iPad to extend your desktop.

When connected as a second display via Sidecar, you can arrange the iPad display wherever you place it on your desk to move the mouse from one display to another easily.
Once you’ve connected an iPad as a second display to your system, it’s easy to jump back over and use it as an iPad. There’s an apparently hidden app in iOS called Continuity that allows this use case, and if you swipe out of the full-screen display, you can use it as an iPad. The Continuity app will show in your dock.
It’s worth noting that when an iPad is connected to extend the display, when you put the iPad to sleep to close it up in a keyboard case, the Mac still sees it connected for a while, so you can lose your mouse if you move it offscreen. When you’re done with it, you can disconnect it in the Display settings or wait for it to time out.
The iPad will initially show on-screen controls in a sidebar, but I turned that off so it could be a full screen with no distractions.
With your iPad connected via Sidecar, it’s time to check the settings in your editing application.
Adobe Premiere Pro
In Premiere, head to Preferences > Playback and check Enable Mercury Transmit. Then, check the appropriate Adobe Monitor device option, which is the iPad. You’ll know this by the size, and in my case, it is Adobe Monitor 2.
DaVinci Resolve
In Resolve, it’s even easier. When the iPad is connected, go under the Workspace menu > Video Clean Feed > Sidecar Display (AirPlay) to get the full-screen playout.
Avid Media Composer
For Avid, it’s a bit more work as you have to select the monitor you want to use for fullscreen playback when you have multiple monitors connected. Head to the Preferences > User tab > Full Screen Playback. From the settings box that pops up, move the whole box to the iPad and click the Select Monitor button at the bottom.
You can map Avid’s Full Screen Playback to a button or use the keyboard shortcut Shift+Command+F (that’s on Mac, CTRL on PC).
Final Cut Pro
Unfortunately, Final Cut Pro does not have quite the same when it comes to fullscreen playback on a second monitor. Checking the preferences, we might expect the A/V Output to work, but that is only for connected video hardware like a Blackmagic or AJA device.
What we can do is use what we have in FCP to get full screen playback on the iPad. First, move the Viewer to the iPad with Window > Show in Secondary Display > Viewers. Then, you can hit the Play full-screen control to take the image full screen.
One caveat of FCP is if you have any tools open in and around your Viewer, like video scopes and multicam angles to the Event Viewer, those will also show when you move the Viewers to the iPad in the secondary iPad display.
I wish Apple would add a true full-screen playback to Final Cut Pro. Many editors have multiple computer monitors connected, and putting full-screen playback onto one of those while still seeing your editing viewer is very, very useful. It’s worth noting that there are some ways to get a full-screen playout via an HDMI or Thunderbolt connection right from your computer. PVC’s resident FCP guru Iain Anderson, reminded me of Apple’s documentation on this and what is supported. None of this works with Sidecar and the iPad’s resolution isn’t supported either.
I envision using an iPad as a secondary display, first and foremost, with a laptop. It’s so easy to connect and is a great size to complement a laptop. It’s worth noting that with the iPad 4×3 aspect ratio, your 16×9 video will be letterboxed, but if you’re sitting with a laptop close to the edge of a table, it’s a very easy use case. And if you don’t want to see the full-screen playback, turn it off and use it as a second display for your NLE panels, video scopes or just the email with all those notes!
And how is the sync?
Just eyeballing it, the sync between the computer and the full-screen playback on the iPad looks good. The naked eye can’t measure milliseconds, but I’ve used this iPad full-screen playback option on several laptops and desktop Macs. While I’m not going to judge the final sync on a Sidecar-connected iPad secondary display, I’m certainly going to (and have) used it as a secondary display many times.
What does the good old sync measuring iOS app Catchin’ Sync say about this iPad sync?
That’s pretty accurate for a wireless display. And if your editing application allows you to adjust the sync on a connected display, then you can use that info to adjust.
So there you have it. An iPad is such a versatile device, and we can add using it as a full-screen editing display to the list. Part 2 of my M4 iPad Pro will discuss this in a bit more detail, coming soon.

