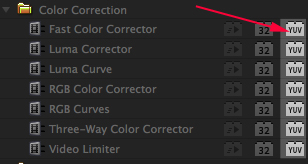
Another area I’m getting pelting with questions about is the little YUV logo on some Premiere Pro effects. What exactly is YUV when talking about video?
Well, it’s a way of breaking the brightness and colors in the image down into numbers, and it’s a little different from RGB, which we discussed last time. Just as a refresher, most cameras take the light coming into the lens, and convert that into 3 sets of numbers, one for Red, one for Green, and one for Blue. This is called RGB, and we discussed how each of those numbers come in different bit depths in my last article.
There’s one big problem with RGB color – it’s tough to work with. If I need to lower the brightness uniformly on an image, I need to do it to all 3 colors. There’s also a LOT of redundancy in the data. To combat this redundancy, there’s a different way of storing the info called YCbCr, which breaks the signal down into a Y, or luminance channel, and 2 channels that store color info without brightness info – a Blue channel and a Red channel that don’t contain any brightness.
Now, the correct way to abbreviate this would be Y, Cb, Cr. However, I want you to try saying YCbCr 10 times, and compare that with saying RGB 10 times. Y, Cb, Cr, is a mouthful. Some engineer somewhere decided that saying YCbCr was just too inconvenient, and borrowed another color term, YUV, to use instead. Technically speaking, saying “YUV” to describe YCbCr is not accurate at all, but the name stuck, and so now, most people who are talking about YCbCr use the term YUV incorrectly. It’s like calling an American football team that plays in New Jersey the “New York Giants.”
Here’s a graphic from the Wikimedia Commons site that shows RGB breakdowns of a frame: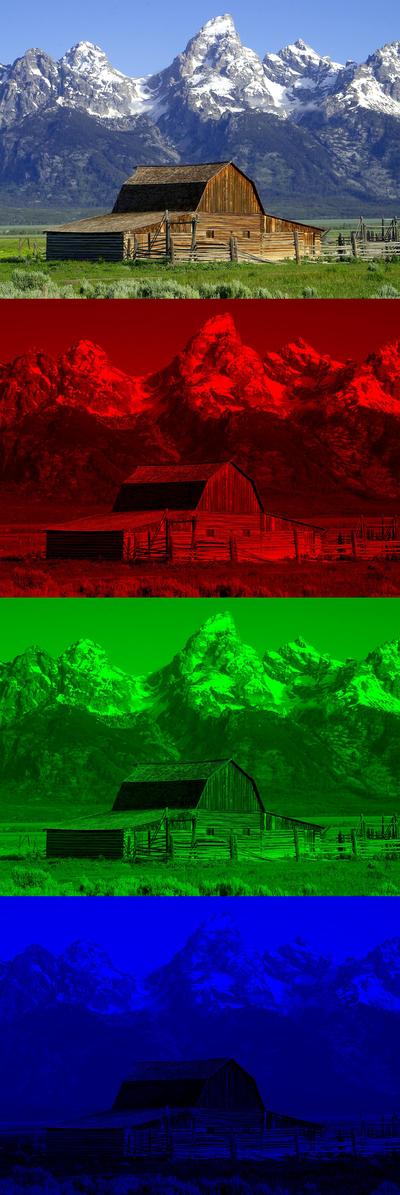
As you can see, the full color image is separated into a Red channel, a Green Channel, and a Blue channel. Pretty straightforward.
Here’s the same image, broken down into YUV channels: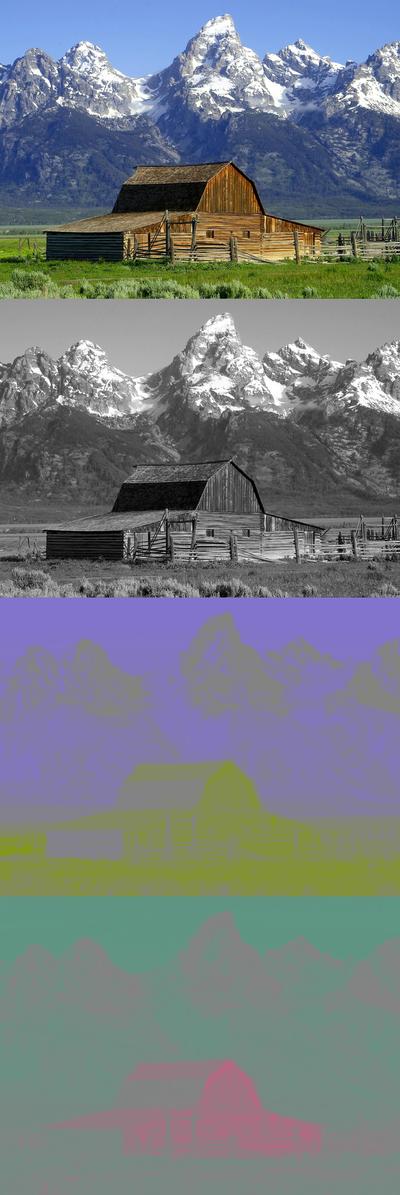
You can see that YUV provides essentially a “grayscale” image from one channel, and the color information is separated out into 2 channels – one for Blue information minus the brightness, and one for Red info minus the brightness. In this image, the Blue channel is showing purple/yellow colors, and the Red channel has more red/cyan colors in this particular image.
The Luminance channel behaves similar to the numbers I described in my last article – it’s a number that starts at 0 and goes up to a maximum number. Easy Squeezy, lemon peasy.
However, the 2 color channels operate a little differently – 0 is a “midpoint” in the number, and there are positive and negative steps. If you look in the above example, you’ll see that the white snow in the shots has a grey color in both the color channels. That’s because it has a 0 value in both color channels. The barn has a negative value in the Blue channel (producing a yellowish color) and a positive value in the Red channel (producing, well, red colors.) Green colors are derived from a mix of negative values in both channels.
Using the “knob” graphic from my last post, here’s what a set of control knobs would look like for an 8-bit YUV signal:
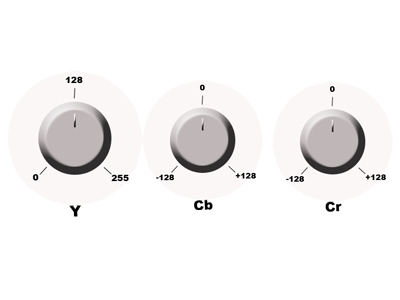
The Y knob has 256 steps, from 0-255, and the U and V knobs range from -128 to +128.
Most major video formats – MPEG-2, AVCHD, DVCPROHD, H.264, XDCAM – all use YUV color space. The pixels are all stored using some variant of Y, Cb, Cr. There are 10-bit and 12-bit versions of YUV as well, and they also behave similarly to 10/12 bit per channel RGB.
When effects are used on a video frame, sometimes the effect needs to convert the values back to RGB before the effect can be applied. In 8-bit or 16-bit-per-channel color space, there can potentially be “rounding errors” when performing this calculation. There are YUV color values that, when converted to RGB, could create negative values. That can’t happen in 8-bit or 16-bit values. This can mean situations where pixels that should pass through an effect unchanged will, in fact change in an unwanted way.
Effects in Premiere Pro that have the YUV logo do the processing directly on the YUV values without converting them to RGB first. At no point are the pixel values converted to RGB, and you won’t see any unwanted color shifting.
32-bit-per-channel color space has the color precision to convert cleanly from YUV to RGB, and will not cause any of these rounding errors. In Premiere Pro, all of the 32-bit effects are “safe” to use.
Let’s look at the same examples from my last article:
1. A DV file with a Gaussian blur and a YUV color corrector exported to DV without the max bit depth flag. We will import the 8-bit DV file, apply the blur to get an 8-bit frame, apply the color corrector to the 8-bit frame to get another 8-bit frame, then write DV at 8-bit. Color and Gaussian Blur are processed natively in YUV, so color accuracy is maintained (although it’s 8-bit.)
2. A DV file with a blur and a YUV color corrector exported to DV with the max bit depth flag. We will import the 8-bit DV file, apply the blur to get an 32-bit frame, apply the color corrector to the 32-bit frame to get another 32-bit frame, then write DV at 8-bit. The color corrector working on the 32-bit blurred frame will be higher quality then the previous example, and again, the signal path is pure YUV.
3. A DV file with a blur and a color corrector exported to DPX with the max bit depth flag. We will import the 8-bit DV file, apply the blur to get an 32-bit frame, apply the color corrector to the 32-bit frame to get another 32-bit frame, then write DPX at 10-bit. This will be still higher quality because the final output format supports greater precision. AND, the signal path again is pure YUV.
4. A DPX file with a blur and a color corrector exported to DPX without the max bit depth flag. We will clamp 10-bit DPX file to 8-bits, apply the blur to get an 8-bit frame, apply the color corrector to the 8-bit frame to get another 8-bit frame, then write 10-bit DPX from 8-bit data. YUV as well.
5. A DPX file with a blur and a color corrector exported to DPX with the max bit depth flag. We will import the 10-bit DPX file, apply the blur to get an 32-bit frame, apply the color corrector to the 32-bit frame to get another 32-bit frame, then write DPX at 10-bit. This will retain full 32-bit YUV precision through the whole pipeline.
As you can see, Premiere Pro really tries to keep color fidelity, and by using either YUV or 32-bit effects, you can be sure that the color in your video is as accurate as possible.

Filmtools
Filmmakers go-to destination for pre-production, production & post production equipment!
Shop Now