For my unfair comparison of three cameras, I had to process RED clips to a greater degree than I had previously, including dealing with odd overexposure artifacts. I relate my experience, both to describe the steps I took to decide on the processing parameters I did, and to show what I ran into when learning to use RED’s tools.
To begin with, the RED shoots R3D files: wavelet-compressed raw data with no in-camera processing applied. The R3D files store metadata—effective ISO rating, white balance (blue/orange balance, as in any video camera) and tint (green/magenta balance, roughly orthogonal to blue/orange balance, so you can really fine-tune white point)—along with the raw image data, so that you have a starting point for grading / color-correction. RED also writes a set of QuickTime reference files (MOVs) alongside the R3Ds, which utilize the R3D codec to extract “proxy-quality” images for quick verification of the shot or direct editing.
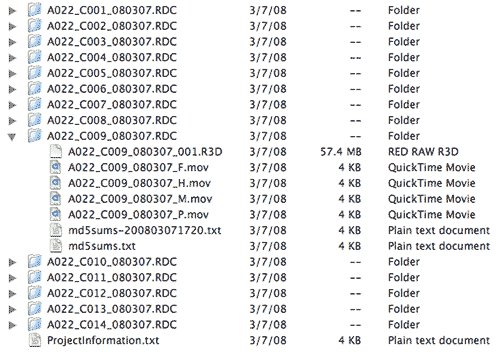
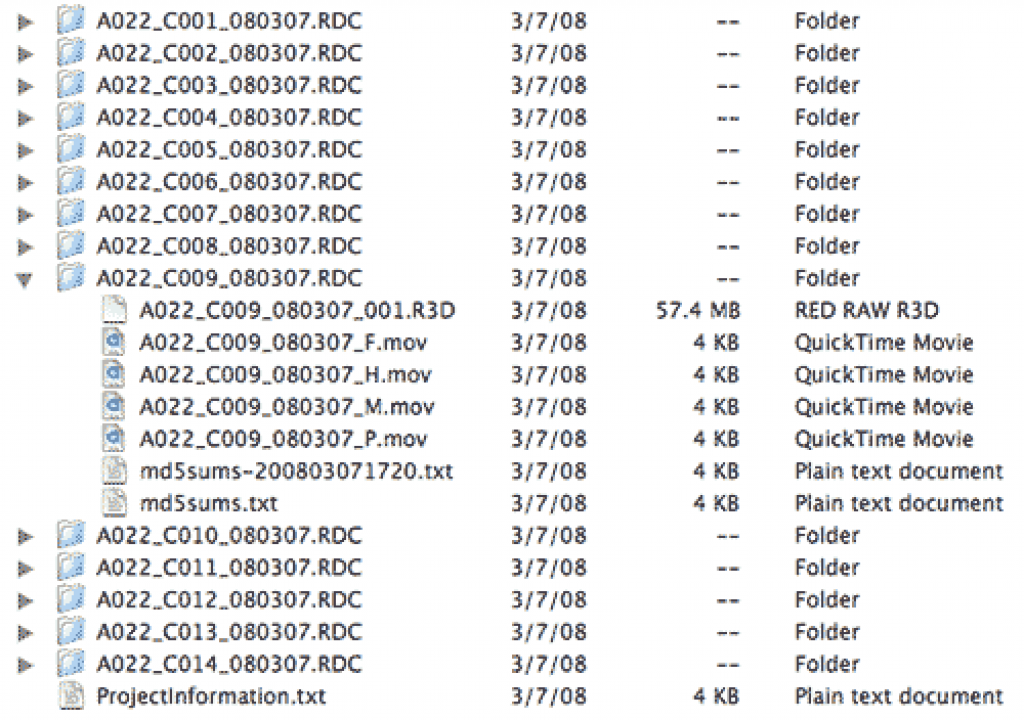
RED file structure: each shot has its own directory. The R3D file is the REDCODE raw file; the MOVs are QuickTime proxies at 4k, 2k, 1k, and .5k resolutions. The TXT files were created by R3D Data Manager when copying the CF card to hard disk.
However, the proxy QuickTimes are “one-light” decodes of the R3D data (you can’t tweak the raw data to correct exposure or color); they’re slow to play on the FCP timeline; and their fixed sizes may not match the scale you need. If you’re serious about image quality or editing speed, or you want an output format other than QuickTime, you’ll want to use one of the “digital darkrooms” that RED provides to pull clips out of R3D files, grade and resize them as needed, and write them to another format, whether it’s a QuickTime movie or a sequence of DPX or TIFF frames (of course, you can use the R3D files directly in a finishing program like Scratch, in which case you can skip this article!).
[Edited 2008-03-22 22:30 PDT: I originally said the QT proxies were only 8-bit, and of lower than full quality, based on what I’d gleaned from reduser.net. Graeme Nattress wrote me and said that saying these were 8-bit was “not strictly correct.” So I tweaked it to say “8 bit (in FCP)”, which prompted Graeme to enlighten me further, saying, “in FCP it will decode them as 32bit float YCbCr if you have 10bit or high precision rendering enabled in the timeline”, which is pretty impressive IMHO. I verified that this is the case, and I stand corrected. Thanks, Graeme!]
I started off by downloading the latest versions of tools from RED’s support page: RED ALERT!, REDCINE, and (if you’re a Mac user and you want to play the proxy files) the Final Cut Studio 2 REDCODE plugin.
Observe that the support page sections for both RED ALERT! and REDCINE have the following cautionary warning:
BETA RELEASE. Support at reduser.net.
The first part states just what RED has been saying all along, and translates to, “use at your own risk.” The latter part effectively means, “no written documentation to speak of; no help files; support has been crowdsourced—again, use at your own risk!”
RED ALERT! is a clip-at-a-time processor. You can pick one of several gammas, tweak de-Bayering parameters. change ISO, white point, and color matrix, and fine tune both the tonal scale and color. RED ALERT! offers both a three-color histogram and superimposed zebras to help you judge your grade. You can save your settings for use on another clip, or transfer them to REDLine, the bundled command-line utility for batch-processing use. You can export 2k or 4k DPXs or TIFFs, DPX or TIFF image sequences, or QuickTime reference movies.
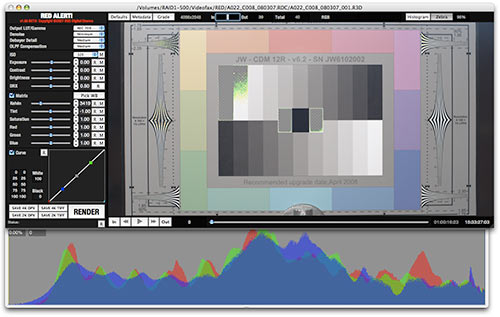
RED ALERT! version 1.5.6 with histogram and zebras shown.
REDCINE does much the same thing, only with the ability to load multiple shots into a timeline; make multiple versions of shots; transcode to any QuickTime codec you have; and zoom, reposition, and crop your clips to any desired output size.
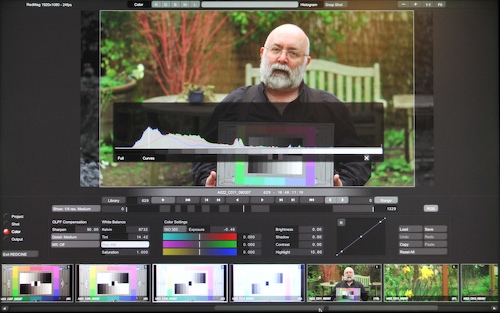
REDCINE build 90, color tab shown, with superimposed histogram.
One initially puzzling thing about REDCINE and RED ALERT! is that they use different language for similar controls. It turns out that RED ALERT! started life as a diagnostic tool written by RED’s image-processing supremo, Graeme Nattress, and was pressed into service when REDCINE—written by the folks behind Assimilate’s Scratch—was delayed. Different tools written by different people, hence the different terminology. They also have different strengths, and some folks find that one works on their system a lot better than the other, so it’s worth downloading both.
RED ALERT has no documentation supplied with it. REDCINE has only a single page of UI shortcuts (displayed when you press the “H” key). But if you poke about on reduser.net long enough, you’ll find these tutorial videos:
http://red.cachefly.net/redcine/interface_overview.mov
http://red.cachefly.net/redcine/project_settings.mov
http://red.cachefly.net/redcine/shot_settings.mov
http://red.cachefly.net/redcine/color_settings.mov
http://red.cachefly.net/redcine/output_settings.mov
http://red.cachefly.net/redcine/library.mov
These are excellent as far as they go, but they are only introductions, and they do leave out a critical bit of information… but between the tutorials and just playing around with the controls, it’s possible to figure out most of what’s needed to get generally-acceptible images out of either program.
Next: Stumbling ahead, one mis-step at a time…
I had previously downloaded the RED tools and codec, following my session with Jim Mathers of the Digital Cinema Society last September, so initially I just started working with the versions I had.
I found that the full-size proxy QuickTimes from the latest captures failed to decode using the Mac codec, so I went off to fetch the latest tool builds. Voilá, decoding problem solved (in QuickTime Player, that is; opening a full-size, 4k RED QT file in FCP or Shake still causes the app to quit unexpectedly. The three smaller sizes work fine, though).
I then spent several hours exporting 4k still frames using various combinations of the parameters in RED ALERT!, trying to determine the effects of differing Debayer and OLPF Compensation settings, and turning Denoise on and off.
- Debayer Detail has three settings: Leading Lady (e.g., low detail); Medium, or High. These vary the aggressiveness of detail extraction, with Leading Lady being quite soft and naturalistic with High being crisper but on the verge of decoding edges too harshly.
- OLPF Compensation appears to be a sharpening algorithm, to offset the softening effects of the Optical Low-Pass Filter RED uses to prevent aliasing. It has settings of Off, Low, Medium, and High.
- Denoise can be simply be turned on or off.
I wound up settling on medium Debayer Detail, medium OLPF Compensation, and Denoise on as the most subjectively pleasing settings: I didn’t see any significant loss of sharpness and resolvable detail compared to the most aggressive settings, yet the images had a smoothness and realistic quality to fine details, without steppiness or artifacting. Denoise hid the color moir© resulting from the half-resolution red and blue signals (Graeme says “Denoise” was originally written for the purpose of suppressing moir©, and that its value as a noise reducer was a side benefit).
I moved over to REDCINE so I could crank through multiple clips and see them side by side, and translated my settings: OLPF Compensation became Sharpen; Debayer Detail became Detail, and Denoise became NR. I verified that the same settings still worked (or as close as I could come; parameter selections also differed from those in RED ALERT!), then looked at resizing, since I intended to convert the 4k originals to HD 1080-line files.
There are ten resizing filters in REDCINE, with no information on how to choose one. A couple of hours nosing about on reduser.net turned up a reference, and a broken link, to page 863 of the Shake user manual. I have Shake, so it wasn’t hard to find the page on my local drive. The “sinc” filter is what Shake uses by default for best downsizing performance; based on that, some general Googling of resizing filters, and a few exported comparisons, I settled on sinc for my resizing.
I tried rough benchmarking of clip exports: I was curious how the choices of noise reduction, resizing filters, and processing quality affected conversion times. It seemed to run unnaturally quickly no matter what I did. Puzzled, I looked at the output files, and they were all freeze-frames of the first frame of the first clip in my timeline—which wasn’t even part of my exported sequence.
Back to reduser.net… Many other guinea pigs—erm, “early adopters”, grin—reported the same problem; one had finally found that deleting REDCINE preferences and reinstalling REDCINE seemed to fix it. I tried that, and it worked for me. Another hour had been sacrificed on the Altar of Science, but I was learning things, so I didn’t feel too bad.
Benchmarks: on my 2.33 GHZ Core2 Duo MacBook Pro, a 13 second sequence took about 10 minutes to export to ProRes422 HQ, whether I was using linear resizing and no noise reduction, or sinc filtering with noise reduction. Clearly the filter didn’t make a huge performance difference, and the noise reduction may not even have worked, since I saw no change in color moir© on the downsized material whether I used it or not.
The speed is tolerable for postproduction film work, but not so hot for quick turnarounds; it’s a good idea to keep the camera-created QuickTimes around for reference… and for audio. REDCINE-generated QuickTimes have no audio tracks, and as far as I ‘ve been able to determine, there isn’t yet any other good way to get at the audio data buried in the R3D files.
Next I rendered clips for my exposure-ramp tests. I found that overexposed highlights went cyan, and suffered a reversal in brightness (detailed explanation in “RED? Or Cyan?”).
I went through several workflows to correct this artifact: I tried adding an S-curve to the data (worked, but lost too much highlight detail); I tried desaturating highlights in FCP (removed the cyan, but not the tone reversal). I eventually reduced exposure to prevent color-channel clipping in REDCINE; exported ProRes; desaturated highlights in FCP; then brought the gain back up to unity (adding a shoulder with the ProcAmp filter). Now I had a decent-looking image.
As it turns out, I didn’t need to go through all that hassle. In an email discussion with Art Adams and Graeme Nattress, Graeme told Art that the DRX control in REDALERT! was designed specifically to cope with this sort of condition (in combination with the exposure slider to prevent color-channel clipping). I for one had never seen it work, because unless you have overexposed stuff in the image, its effect is invisible—I had fiddled with it on normally-exposed footage and dismissed it as some inscrutable or as-yet-unimplemented thing, and I never saw any documentation to tell me otherwise.
Graeme said the Highlight control in REDCINE was supposed to do the same thing as DRX. However, neither I nor (as far as I could tell) anyone on reduser.net could get the Highlight to do anything at all. It was a mystery control: the tutorial videos never mentioned it, and I couldn’t find information about it anywhere.
Then, day before yesterday, a correspondent on CML (the Cinematography Mailing List), responding to one of Art’s queries, said that it did in fact work—you just had to adjust another control afterwards before the effect would become visible. I found that I could simply double-click any of the other slider controls, and the Highlight control would take effect. Sheesh. It’s a simple bug, and one that’s supposed to be fixed in the next build, but it still stymies anyone who doesn’t know the workaround.
Now, after ten days, I can finally do most of what I need in REDCINE. And all it took was about eight hours of snuffling through reduser.net, several false starts with the apps, and a lucky break with a message on CML.
It took a long time, but I’m now at the point where I think I know how to crank basic clip corrections through the RED apps.
So, is there a point you can take away from this rambling narrative? Some possibilities come immediately to mind:
This is bleeding-edge stuff. Unfinished. Untested. Undocumented. Beta code, remember? Yes, REDs are on sale; yes, rental houses have REDs. No, it’s not a finished product; no, there aren’t the levels of documentation and support we’re used to seeing.
I’m not going to pass judgment on whether this is an Evil Thing or a Brilliant Strategy or even a bit of both; all I’m saying is that this is the way it is. Deal with it. If you’re not willing to play guinea pig and roll with the punches, you shouldn’t be playing with RED in the first place.
For all of that, and for all the negativity I hear around the subject, I’ve not yet had a single crash or hang in RED ALERT! or in REDCINE. I may just be lucky: I have an ATI graphics adapter in my MacBook Pro, and I’m running the safe and reliable OS X 10.4.11 and QuickTime 7.3.1. Nonetheless, on my system the RED apps Just Work.
Working with RED requires lots of [painful] learning. This is true. It’s not a film camera; it’s not a video camera, it’s a digital mopix camera shooting raw data. The workflows are different from what we’re used to, and some things—like colored overexposed highlights—are things we as end-users haven’t had to deal with before (video cameras process them internally; film’s DlogE curve masks the problem). So there’s definitely New Stuff to be learned.
The learning problem is exacerbated by the lack of any sort of structured documentation, aside from the skeletal operations guide and the REDCINE tutorial videos. RED’s idea of training is to crowdsource it on reduser.net. Crazy, or crazy like a Web2.0 fox? Whatever you think about it, the cold, hard reality is that one has to spend a lot of time wading through hundreds of forum posts, many of them frustratingly off-topic, to pick up the occasional nugget of useful information. Until RED or a third party steps in to fill the void, there simply isn’t any alternative.
Bear in mind that things will get easier as time goes by: you’ll start to become more familiar with the camera and the tools as you work with them, and the pain will diminish as your comfort level grows.
But still: much pain and suffering at the beginning. It’s supposed to build character.
So if you want to play with RED, don’t go into it expecting everything to work perfectly, or work the way you expect. Don’t go in expecting full documentation. Expect that there will be glitches and hangups and false starts and unexplained happenings. Expect to spend many frustrating hours poring over reduser.net in search of some elusive scrap of information that may or may not be present.
If you can survive the learning curve, you’ll be able to deal with RED, and be the envy of your peers and associates. Whether that gain is worth the pain is up to you to decide; I just thought I’d show you what the learning curve is like… and maybe help you avoid some of the dunderheaded stumbling blocks I tripped over.

Filmtools
Filmmakers go-to destination for pre-production, production & post production equipment!
Shop Now